1916: The relief of Kut and the Erzurum Offensive
Battle of Romani
- Dates:
- 4–5 August 1916
- Front:
- Middle East
- Location:
- The belt of dunes around Romani railway station, about 35–40 km east of the Suez Canal, between the Bardawil lagoon and the sands of northern Sinai (Egypt)On the battle map →
- Sides:
- United Kingdom, Australia and New ZealandArchibald Murray, Herbert Lawrence, Harry ChauvelOttoman Empire, German Empire and Austria-HungaryFriedrich Kress von Kressenstein
- Result:
- British victory. The attack on Romani collapsed and nearly 4,000 soldiers were taken prisoner. Kress nevertheless managed to withdraw his main force and almost all his artillery to Bir el Abd and then to El Arish.
- Author:
- Natalia
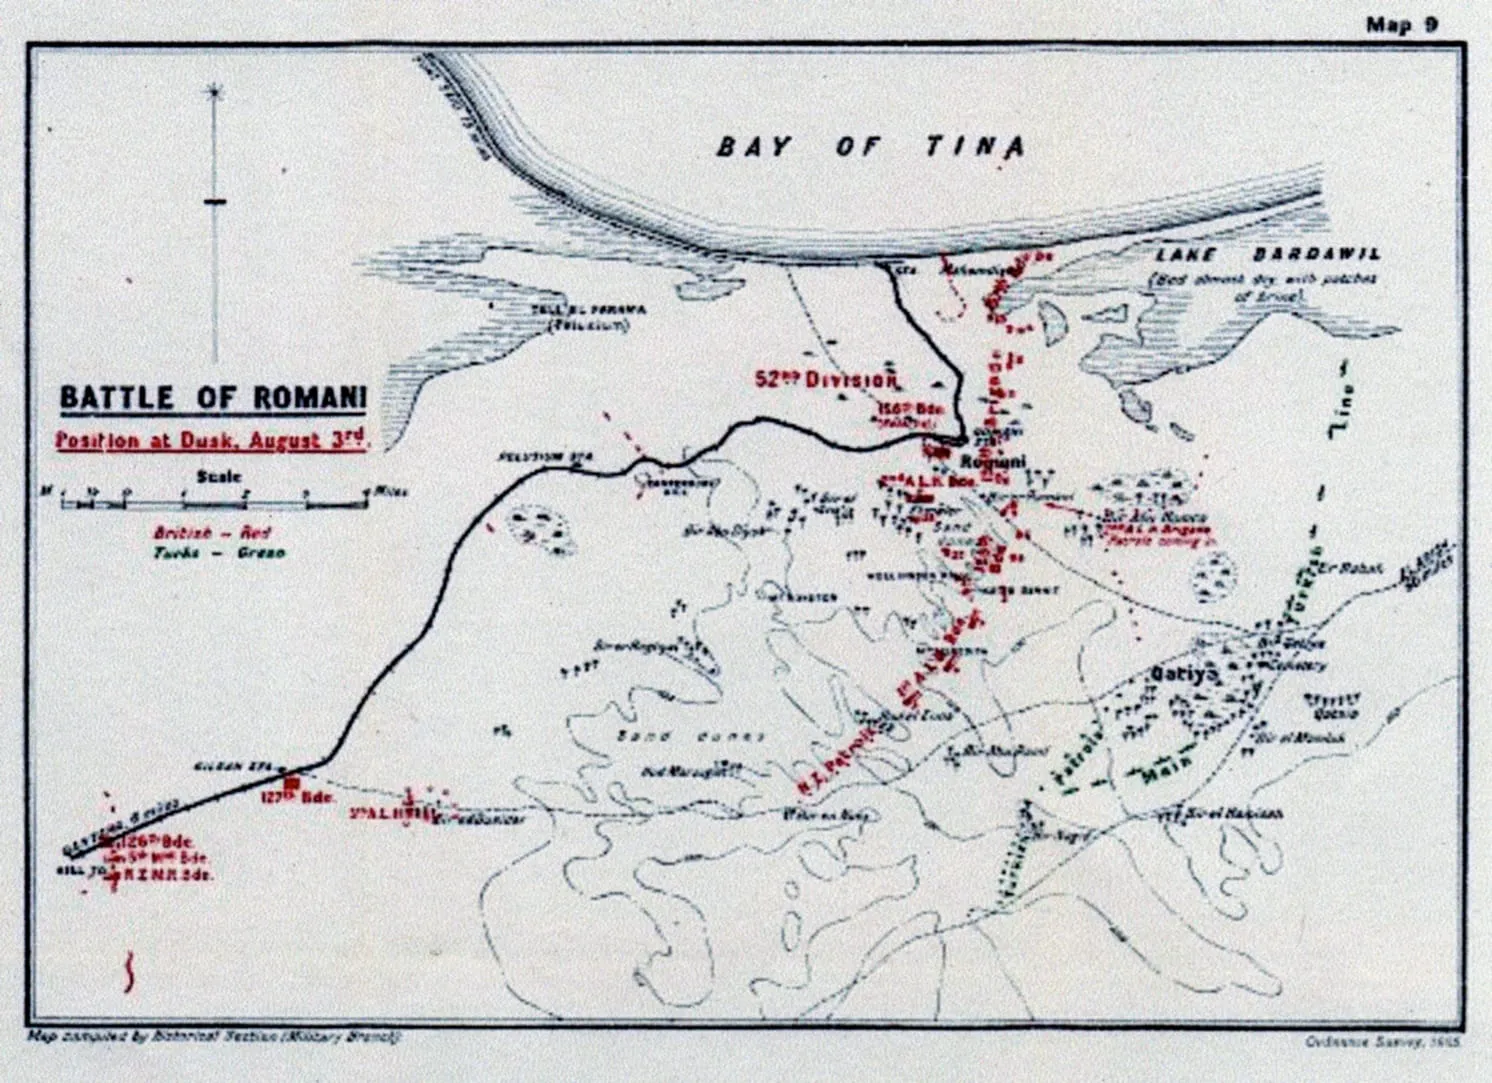
The Battle of Romani was the second and last serious attempt by the Ottoman army to threaten the Suez Canal. On the night of 3/4 August 1916 about 16,000 Ottoman soldiers, supported by German and Austro-Hungarian special units, attacked the fortified British position at Romani in northern Sinai under the command of the Bavarian colonel Friedrich Kress von Kressenstein. Two brigades of the Australian Light Horse held up the attack in the dunes south of the camp throughout the night and the morning, and in the afternoon New Zealanders and British yeomanry drove the Turks from their furthest-advanced flank. On the morning of 5 August more than one and a half thousand exhausted Ottoman soldiers surrendered on Wellington Ridge, and the rest of the expedition began to fall back eastwards.
Name and dates
The British official history of operations in Egypt and Palestine (George MacMunn and Cyril Falls, Military Operations: Egypt and Palestine, vol. I) calls the engagement the Battle of Romani, after the railway station and camp around which the fighting took place. The name is used in the same form in Polish literature. The first shots were fired before midnight on 3 August, so some accounts, including the English and Turkish Wikipedia, give the dates 3–5 August. The actual attack, however, began after midnight, on 4 August, and we take that date as the start of the battle. We take its end as 5 August, when the Turks finally left the battlefield and, after a rearguard action at Katia, withdrew eastwards. The pursuit, including the failed attack on Bir el Abd on 9 August, lasted until 12 August, but the official history already describes it as a separate phase.
Background
The first Ottoman attack on the canal in February 1915 had broken down on its bank. Afterwards the British pushed the defence far to the east. From the spring of 1916 the troops of General Archibald Murray, who had commanded all forces in Egypt since March, built a standard-gauge railway and a water pipeline from Kantara into Sinai. In May the track reached Romani, where there were wells and where a belt of high, shifting dunes began, stretching several kilometres inland from the sea. The infantry of the Scottish 52nd (Lowland) Division of Major-General W. E. B. Smith fortified it with a line of redoubts running southwards from the coast. The position was called No. 3 Section of the Canal Defences and was under Major-General Herbert Lawrence, who had his headquarters at Kantara.
Kress von Kressenstein, who had prepared the 1915 attack, was still active in Sinai. On 23 April 1916 one of his regiments routed British yeomanry at Katia and Oghratina, a dozen or so kilometres east of Romani. In July a new expedition set off across the desert. Its core was the Ottoman 3rd Infantry Division, made up of the 31st, 32nd and 39th Regiments, with a camel cavalry regiment. The Germans added a formation code-named “Pasha”: machine-gun companies, anti-aircraft artillery, batteries of heavy guns and howitzers with German officers and NCOs, and an air squadron, while Austria-Hungary added two batteries of mountain howitzers. According to the official history the force numbered about 16,000 men on ration strength. The aim was limited: to take Romani, dig in opposite Kantara and shell the canal with heavy guns.
The British detected the march on 19 July, when enemy columns were spotted from an aircraft at the wells of Bir Bayud and Bir el Abd. Over the next two weeks the Turks advanced slowly, entrenching each successive position, because the heavy artillery kept sinking in the sand. The 1st and 2nd Light Horse Brigades took turns riding out towards Katia every morning, harassing the Turkish outposts and returning to camp in the evening. Murray’s staff wanted the enemy to attack a prepared position. Murray assumed that Kress would not throw his main force against the redoubts but would try to outflank them from the south, through the dunes behind the right flank. Major-General Harry Chauvel, commander of the Anzac Mounted Division, therefore laid out a position about 6 kilometres long in that direction, from the high dune of Katib Gannit to the basin of Hod el Enna. He did not have it entrenched, so as not to reveal it to the German airmen, but the officers of both brigades got to know the ground thoroughly. The Australians were to stop the enemy, and once he was committed, the yeomanry and New Zealanders in the rear, from Hill 70 and Dueidar, were to strike his flank. In all Lawrence had about 14,000 soldiers and 36 guns at Romani. The 42nd (East Lancashire) Division was being brought up from the canal.
Course
Night of 3/4 August. On the evening of 3 August the Turks reached Katia. According to the official history they followed the 2nd Brigade as it returned from its daily reconnaissance, hoping to get round the British position on its heels. The regularity of the Australian patrols turned out to be a weakness here. The 1st Brigade of Lieutenant-Colonel J. B. Meredith occupied the prepared line at dusk. After deducting the horse-holders it had, like the 2nd Brigade, no more than 800 rifles for dismounted fighting. Just before midnight the outposts reported strong forces in front, and after an hour of silence heavy firing broke out along the whole line. By two o’clock the Turks were in places 50 metres from the Australians. At 2.30 a.m., shouting, they charged the dune of Mount Meredith in the middle of the line. The first assault broke down, but the Australians, pressed from both sides, abandoned the hill at three, and at 3.30 a.m. mounted their horses and fell back to a second line.
4 August, morning. Dawn showed the Turks how thinly the position was held, and the Australians that the enemy was outflanking their right. The 1st Brigade fell back slowly, unit by unit, to Wellington Ridge, the dune overlooking the camp. At about 4.30 a.m. Chauvel committed the 2nd Brigade of Colonel J. R. Royston, but the enemy kept pushing back the right flank, advancing along the valley between Wellington Ridge and the dune of Mount Royston, about 4 kilometres further west. At about seven the last squadrons came down off the ridge. When an hour later the Turks appeared on it and fired on the camp, they were driven off by the fire of the Ayrshire and Leicestershire horse batteries. At the same time the Ottoman infantry attacked the redoubts of the 52nd Division, but the bombardment of the most advanced works, though heavy, made no breach, and the assault broke down 150 metres in front of No. 4 Redoubt.
The most dangerous move was the outflanking from the west, towards the railway. According to the official history it was held up for two hours by a squadron of the Gloucestershire Hussars under Major G. E. Turner, which on its own initiative, without orders, advanced from Pelusium station against the infantry visible on the slopes of Mount Royston. By then the attackers were already exhausted: for several nights they had been marching through the dunes, had drunk the water in their bottles and were advancing in mounting heat with no hope of more. From 5.35 a.m. Lawrence sent one mounted unit after another into the fight. The New Zealand Mounted Rifles Brigade of Brigadier-General Edward Chaytor, which was to strike the enemy’s rear, had to turn towards the dune of Canterbury Hill in front of the railway, because the enemy had already got further than expected.
4 August, afternoon. At about 2 p.m. the New Zealanders, supported by the Somerset battery of horse artillery, advanced on foot through loose sand on Mount Royston, where about 2,000 Turks were digging in. At 5 p.m. a squadron of the Gloucestershire Hussars and two troops of the Worcestershire Yeomanry of the 5th Mounted Brigade galloped up onto the southern crest of the dune. The defenders did not wait for the charge. From the crest the yeomen shot down the horses of a pack-gun battery in the hollow below, and the Turks began to surrender. By 6 p.m. the New Zealanders and yeomen, supported at last by battalions of the 127th Brigade that had arrived by rail, had occupied the whole dune, taking about 500 prisoners, a battery and two machine guns. In the evening two battalions of the Scottish 156th Brigade came up below Wellington Ridge, but in the darkness they were stopped by heavy fire. The brigade commander told them to wait until dawn and not let the enemy slip away during the night.
5 August. At dawn the 8th Battalion Scottish Rifles, with the Australian 7th Light Horse Regiment and the New Zealand Wellington Regiment, advanced on the ridge. According to the official history the defenders, who already knew they had been abandoned, hoisted a white flag. 864 soldiers surrendered to the Scots alone, and in the whole area of Wellington Ridge about 1,500 prisoners were taken, most of them utterly exhausted and long without water. At 6.30 a.m. Lawrence gave Chauvel command of all the mounted troops and ordered a pursuit. The horses, however, had to be gathered and watered, and the infantry, which was waiting for water and the allotment of camels, set off very late. The 3rd Light Horse Brigade routed the Turkish left-flank guard at Hamisah, taking 425 prisoners and seven machine guns. In the afternoon three Australian brigades and the yeomanry attacked Katia, but the Turkish panic that had been counted on did not come. The fire from the oasis was accurate and the marshy ground stopped the horses. At dusk Chauvel called off the attack. Some horses had not drunk for 60 hours, and the men were falling asleep in the saddle. During the night the Turks withdrew to Oghratina.
Pursuit
Kress had prepared positions along his line of retreat in advance, and now it paid off. On 6 and 7 August the mounted troops tried in vain to dislodge him from Oghratina, while the infantry marched east in terrible heat. From the 127th Brigade alone 800 men fell out on the way, and the next day aircraft and patrols searched the desert for the missing, often delirious with fever. By 8 August the Turks were back at Bir el Abd, which they had left three weeks earlier. On 9 August Chauvel attacked this position with five brigades, totalling no more than 3,000 rifles. The enemy, stronger in men and guns, went over to counter-attacks, and at 5.30 p.m. Chauvel ordered a withdrawal. It cost more than 300 killed and wounded. Murray telegraphed to London that the Turkish infantry was marching almost as fast as his mounted troops. On 12 August Bir el Abd was empty, and Kress fell back through Salmana to El Arish, leaving an outpost at Bir el Mazar.
Casualties
According to the official history British losses in the battle and pursuit amounted to 1,130 men: 202 killed, 882 wounded and 46 missing, mostly from the Anzac Mounted Division. The Ottoman side cannot be counted exactly. The British took nearly 4,000 prisoners, as well as a mountain battery, 9 machine guns, 2,300 rifles, a million rounds of ammunition, about 500 camels and two complete field hospitals. Murray, counting the dead found, estimated the enemy’s total losses at 9,000. According to Otto Liman von Sanders, head of the German military mission in Turkey, the corps lost about a third of its strength in the attack and the retreat to El Arish, which the official history works out at about 5,500–6,000 men. Some accounts state that about 1,250 dead were buried after the battle.
Significance
Romani was a clear British victory, though an incomplete one. Kress skilfully withdrew his heavy guns and kept an army capable of fighting, and the official history lists the reasons: the speed of the Turks’ march in sand and heat, the change in the New Zealanders’ task, who struck the enemy almost frontally instead of in the rear, difficulties with communications and water, and the too slow march of the infantry, unused to the desert and to camels. Liman von Sanders wrote that the expedition had been too weak, the British had known its intentions, and the soldiers had reached their objective completely exhausted.
The battle ended the campaign against the canal. Further expeditions were later planned in Constantinople, but none was undertaken. The initiative passed to the British. In the following months Murray’s troops, continuing to build the railway and pipeline, advanced across Sinai towards El Arish and the Palestinian border, and the Anzac Mounted Division, which had borne the brunt of the fighting at Romani, became the core of the forces in the Sinai and Palestine campaign.
Spotted a mistake?Report an error