1916: The relief of Kut and the Erzurum Offensive
Battle of Agagia
- Dates:
- 26 February 1916
- Front:
- Middle East
- Location:
- Sand dunes at Agagia (Agagiya), about 22–24 km south-east of Sidi Barrani, on the coastal plain of the Western Desert (Egypt)On the battle map →
- Sides:
- United Kingdom and Union of South AfricaWilliam Peyton, Henry Lukin, Hugh SouterSenussi and Ottoman EmpireJafar al-Askari, Nuri Bey
- Result:
- British victory. The Senussi forces lost their position and, by British estimates, about 500 men, and their commander Jafar al-Askari was taken prisoner. On 28 February the British entered Sidi Barrani unopposed.
- Author:
- Natalia
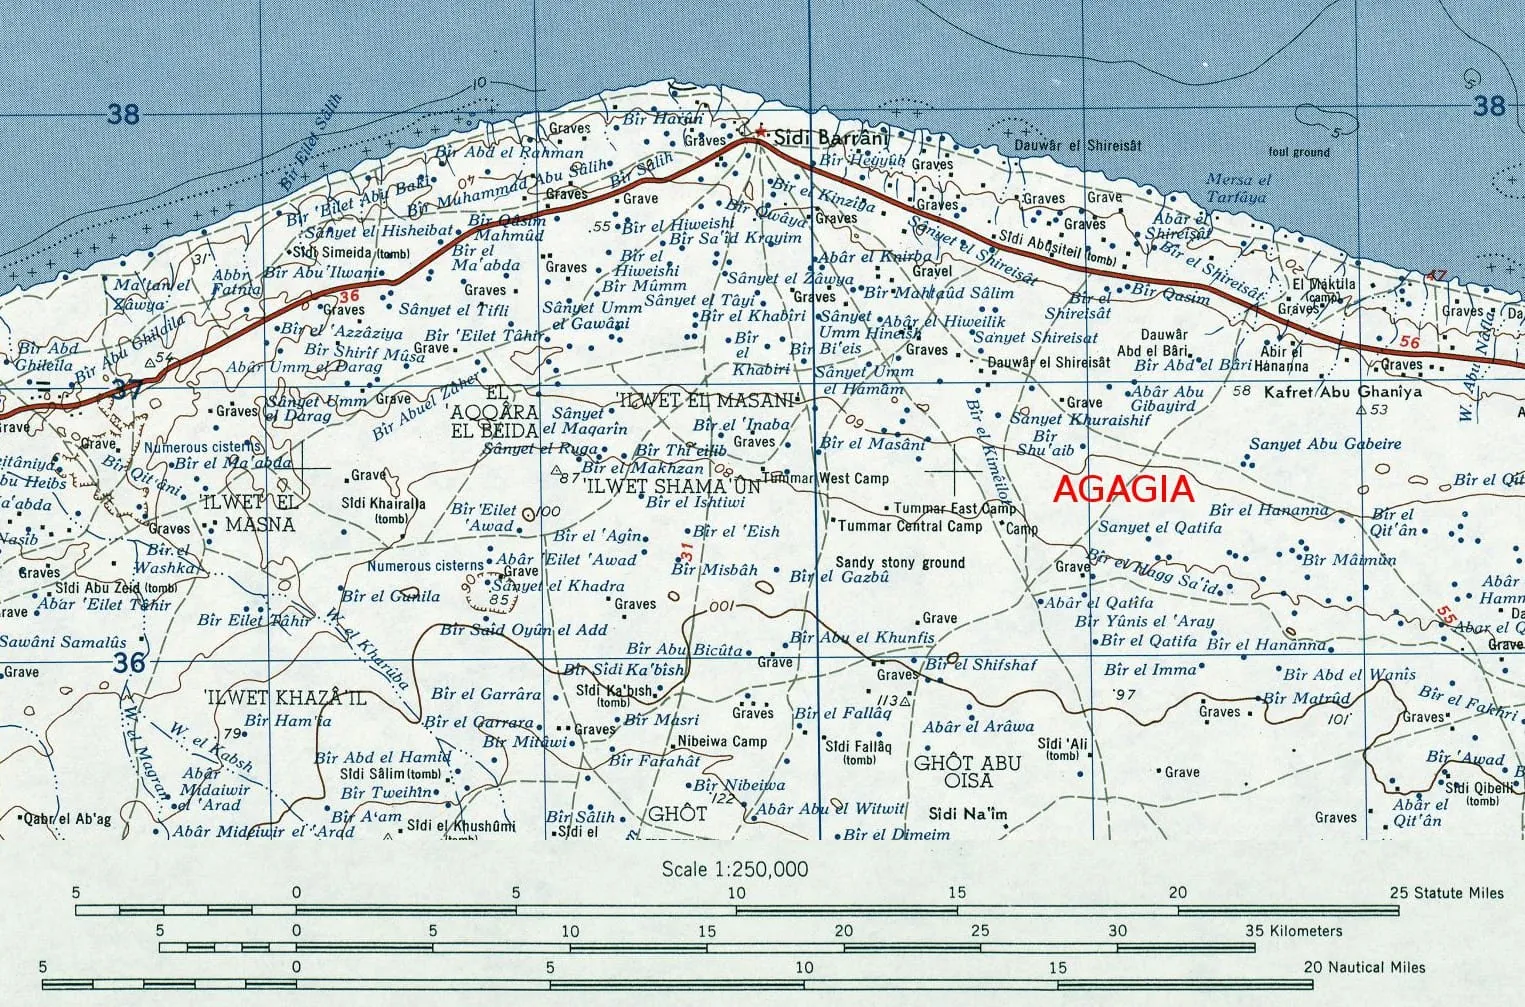
The Battle of Agagia was the decisive engagement of the war against the Senussi order on Egypt’s western frontier. On 26 February 1916 the column of Brigadier-General Henry Lukin, made up mainly of South African infantry, attacked the order’s camp among the dunes south-east of Sidi Barrani and after several hours’ fighting drove the enemy out of it. Earlier British victories had ended with the Senussi forces slipping away into the desert. This time the retreating column was caught by the Dorset yeomanry and broken by a cavalry charge. The commander of the Senussi forces on the coast, Jafar al-Askari, was taken prisoner.
Name and dates
The site of the battle, a group of sandy hillocks on a low plateau, is spelt in various ways in the sources: Agagia, Agagiya, Aqqaqia. The British official history of operations in Egypt (MacMunn and Falls, Military Operations: Egypt and Palestine, vol. I) calls the engagement the “action of Agagiya” and places the camp about 15 miles (24 km) south-east of Sidi Barrani, while the South African official history and The Times History of the War give 14 miles. There is no established Polish name in the literature. The battle lasted one day, 26 February 1916. The day before, 25 February, there had been a brief exchange of fire when the Senussi guns shelled the British camp.
Background
The war on Egypt’s western frontier began in November 1915, when the order’s men attacked Sollum. The British withdrew their posts to Mersa Matruh and assembled the Western Frontier Force there. In December and January its columns defeated the Senussi forces three times: at Wadi Senab, at Wadi Majid and on 23 January at Halazin. Each time the enemy, led by the Ottoman officers Nuri Bey, Enver Pasha’s half-brother, and Jafar al-Askari, withdrew skilfully, and the British cavalry was unable to catch him. At Halazin the British lost 312 men, and the Senussi forces escaped once again.
In February the Western Frontier Force changed beyond recognition. It received 2,000 camels and for the first time could move far from Matruh and remain in the desert for a long time. The 2nd Mounted Brigade arrived, with yeomanry from Buckinghamshire, Berkshire and Dorset and a battery of horse artillery from Nottinghamshire, while the 15th Sikhs, until then the force’s only well-trained unit, which had borne the brunt of all the fighting, left for India. They were replaced by the South African infantry brigade of Brigadier-General Henry Lukin, a veteran of the Boer War and of the campaign in German South West Africa, which had arrived in Egypt in January. Lukin reported at Matruh on 4 February. The previous commander, Major-General Alexander Wallace, suffering from an old wound, asked to be relieved, and his successor, Major-General William Peyton, took over command around 10 February.
The aim was to recover Sollum. The commander of the forces in Egypt, General John Maxwell, judged a landing in the bay at Sollum too risky: the harbour entrance was mined and steep hills rose above the bay. He therefore decided to go overland, first taking Sidi Barrani and turning it into a base supplied from the sea. According to intelligence, the main Senussi forces were in the area of Sidi Barrani. So as not to scare them off, the British spread a rumour in Cairo that the Western Frontier Force was withdrawing from Matruh. Peyton set up a depot at Unjeila, halfway to Sidi Barrani, and on 20 February Lukin marched out of Matruh with the 1st and 3rd South African Infantry Battalions, the 6th Battalion, Royal Scots, the Dorset Yeomanry, a squadron of Buckinghamshire Hussars, the Nottinghamshire battery and a field ambulance. He was accompanied by light armoured cars.
Forces and plan
Air reconnaissance located the Senussi camp among the dunes at Agagia, and Bedouin reported that Nuri and Jafar were there. The leader of the order himself, Sayyid Ahmed al-Sharif, had gone to the oasis of Siwa, from where he directed an expedition against the oases of the Western Desert. His men occupied the Bahariya oases on 11 February. Lukin left the New Zealanders and the Royal Scots at Unjeila, on 23 February marched 19 km to Shammas, and on 24 February a further 26 km to the mouth of Wadi Mehtila, where he set up a fortified camp by the sea, about 13 km north-east of the enemy camp.
The British estimated Jafar’s force at about 1,500 men with three guns and five machine guns. He himself gave a figure of 1,600 after the war. Its core was the muhafiziya, the order’s regular soldiers trained by Ottoman officers, supplemented by Bedouin. The British official history judged the enemy’s dispositions excellent, especially against an opponent weak in artillery: large yellow dunes on a slight rise, an area about 1.6 km wide and more than 3 km deep, entrenched and in places wired. To the north, from where the British had to come, there was no cover at all.
Lukin wanted to rest his men on 25 February and approach the camp by night to attack at dawn. Jafar, however, did not wait to be attacked. At 5.30 p.m. on 25 February two of his guns and a machine gun shelled the British camp. The British artillery quickly silenced them, but Lukin, expecting a further attack, gave up the night march.
Course: the infantry attack
At 5 a.m. on 26 February the yeomanry rode out to reconnoitre and found that the enemy had not moved from the dunes and had not even put out outposts. At 9.30 a.m. Lukin led the column out of camp. The commander of the Dorset Yeomanry, Lieutenant-Colonel Hugh Souter, an officer of the 14th Lancers of the Indian Army, was ordered to be ready to cut off the enemy’s retreat. The yeomanry, apart from one squadron on the left flank, worked round the position to the west and occupied dunes from which it had a good view of it. The dismounted cavalrymen pinned the enemy down with their fire, and two armoured cars, though they bogged down in the soft sand, suppressed his machine guns.
The infantry was led by the 3rd (Transvaal) Battalion under Lieutenant-Colonel E. F. Thackeray, followed in reserve by the 1st (Cape Province) Battalion under Lieutenant-Colonel F. S. Dawson. At 11 a.m. the battalion deployed for the attack, and at 11.20 a.m. its leading troops came under fire. The men advanced in line, at two paces’ interval, with machine guns on the flanks, supported by the fire of the Nottinghamshire battery. The enemy replied with three guns, machine guns and rifles, so well concealed that the South Africans could not see him. According to the British official history they crossed the open ground “with admirable steadiness”. While they were far off they suffered few casualties, but as they drew near the dunes these began to mount quickly.
Jafar then resorted to his favourite manoeuvre, with which he had pushed back the British flanks at Halazin: a rapid envelopment of the British left. This time a company of the 1st Battalion, pushed forward onto the threatened flank, beat off the counter-attack. Lukin immediately threw in his reserves and ordered an assault. The infantry took the first line at the edge of the dunes at a rush. The position was deep, however, and small groups of defenders fell back fighting among the hillocks. Only at 3.15 p.m. did both battalions reach the southern edge of the dunes. The enemy was no longer there.
Course: the charge of the Dorset Yeomanry
Souter, informed by Lukin of the assault, decided not to attack the enemy among the dunes, where there might be trenches and wire, but to wait until he came out onto open ground. He rode parallel to the enemy’s line of retreat, about a kilometre to the west of it. At around 2 p.m. he saw the whole retreating column, strung out over a mile and a half: in front the camels and transport covered by Bedouin, behind and on the flanks the muhafiziya with machine guns. The Buckinghamshire Hussars squadron had meanwhile galloped off after a small camel convoy that had broken away from the column and did not get back in time. Souter therefore had only three squadrons of Dorsets. According to his report, at about 3 p.m. he dismounted them one last time to rest the horses, and the officers examined the ground, which rose gently towards the enemy but had no obstacles for cavalry.
The regiment moved off in two lines at a steady gallop. The three machine guns of the rearguard opened fire, accurate at first, then more and more erratic, until it finally fell silent. Fifty yards from the enemy Souter gave the order to charge. The rearguard, which until then had held firm, scattered before the sabres, and the Bedouin fled into the desert. Souter’s horse was killed under him, and in its last strides the animal threw him almost at Jafar’s feet. For a moment the colonel, Second Lieutenant Blaksley and Private Brown, also unhorsed, stood among some fifty enemy soldiers. The situation was decided by the arrival of a machine-gun section. The wounded Jafar and two other Ottoman officers were taken prisoner. Nuri managed to escape, although for some time he was believed to have been killed. The horsemen pursued the fugitives far into the desert, cutting many of them down with their sabres.
Losses
The British lost 184 men: 47 killed, including 6 officers, and 137 wounded. The Dorset Yeomanry paid the highest price: according to the official history, 32 killed and 26 wounded. One squadron lost all its officers. The 3rd South African Infantry Battalion also suffered heavy losses. The British estimated enemy losses at about 500 men. The Times History of the War wrote more cautiously of over 200 killed and wounded left on the field. 39 prisoners were taken. Sixty camels laden with dates and 40,000 rounds of ammunition were captured, and the tents of the camp were burnt. Souter received the Distinguished Service Order (DSO), and Second Lieutenant John Blaksley and Private Brown, who had been with him when Jafar was captured, the Military Cross and the Distinguished Conduct Medal respectively.
Significance
The British official history called the charge of the Dorset Yeomanry the most important event of the whole campaign. Without it the enemy would have slipped away again, and the battle would have ended like the fighting at Wadi Majid and Halazin, in an indecisive success. After Agagia the Senussi forces never again waited for a British attack. The loss of Jafar, who had trained the muhafiziya, deprived the order of its ablest commander and, according to the official history, made its forces far less dangerous.
On 28 February Lukin entered Sidi Barrani unopposed. Nuri gathered the survivors and fell back on Sollum, but when Peyton’s columns approached from the direction of the Halfaya Pass in mid-March, the order hastily abandoned the town, and on 14 March the British reoccupied it. The Duke of Westminster’s armoured cars caught the fleeing troops the same day and captured three guns, all that the enemy had on that front, and on 17 March at Bir Hakeim they freed 91 prisoners from the ships Tara and Moorina, sunk in November. The war against the order moved to the oases of the Western Desert and lasted until early 1917, but, as the official history puts it, from then on the British fought the desert more than men.
Lukin’s brigade sailed for France in April, where in July 1916 it suffered enormous losses in Delville Wood during the Battle of the Somme. Jafar al-Askari was imprisoned in the Citadel in Cairo. When he learnt of the executions of Arab activists in Syria, he volunteered to serve the Sharif of Mecca and commanded the regular troops of the Arab Revolt. After the war he was twice Prime Minister of Iraq. He was killed in 1936, murdered during a coup d’état.
Spotted a mistake?Report an error