1917: Baghdad and Gaza
Battle of Beersheba
- Dates:
- 31 October 1917
- Front:
- Middle East
- Location:
- Beersheba and its approaches, from the trenches west and south-west of the town to the hill of Tel el Saba and the plain east and south-east of it, on the edge of the Negev desert in southern Ottoman Palestine (today Israel)On the battle map →
- Sides:
- United Kingdom, Australia and New ZealandEdmund Allenby, Philip Chetwode, Harry ChauvelOttoman Empire and German EmpireFriedrich Kress von Kressenstein, İsmet Bey
- Result:
- British victory. Beersheba and most of its wells fell into British hands the same day. The British took almost 2,000 prisoners and 15 guns.
- Author:
- Natalia
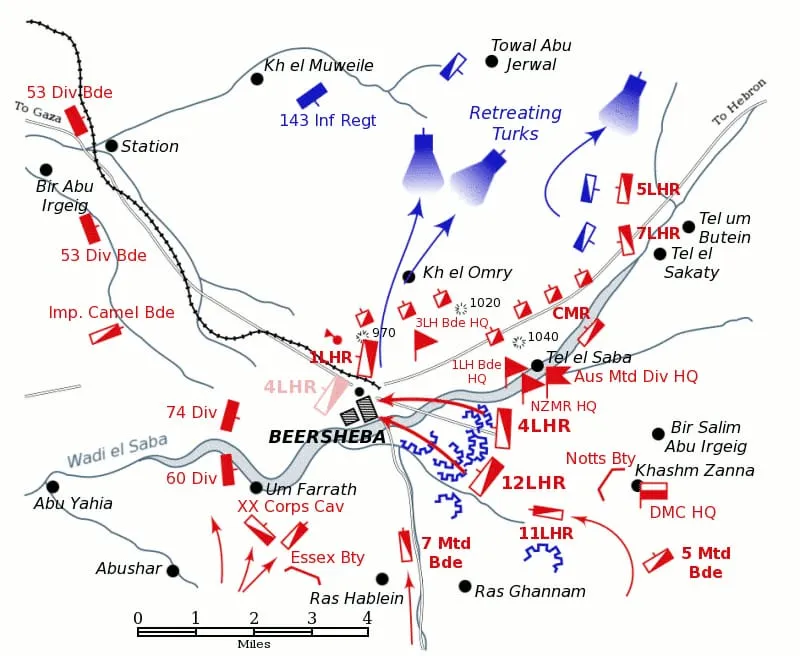
The Battle of Beersheba opened General Edmund Allenby’s autumn offensive in Palestine and broke the six-month deadlock on the Gaza – Beersheba line. On 31 October 1917 two British infantry divisions attacked the town from the west, and two mounted divisions, after a night march across the desert, from the east. In the morning the infantry took the trenches on the western approaches, but the cavalry fought for the hill of Tel el Saba until the afternoon, and the day was drawing to a close. The town, and above all its wells, had to be taken before dark, because without water the horses could not go on fighting. At dusk two regiments of the Australian Light Horse from the 4th Brigade galloped across about 6 kilometres of open plain, jumped the Turkish trenches and burst into Beersheba before the defenders could blow up the wells. The charge at Beersheba became one of the most famous episodes in the history of the Australian army.
Name and dates
The British Battles Nomenclature Committee counted the capture of Beersheba as part of the Third Battle of Gaza, that is, the whole series of fights for the Gaza – Beersheba line from 27 October to 7 November 1917. The British official history (Cyril Falls, Military Operations: Egypt and Palestine, vol. II) describes it in a separate chapter entitled The Capture of Beersheba, and the Australian official historian Henry Gullett writes of “the Battle of Beersheba”. In Turkey the fighting is called the Battle of Birüssebi. The battle lasted one day: the artillery opened fire at 5.55 a.m. on 31 October, and the first horsemen burst into the town shortly after sunset. The fighting in the hills north of Beersheba on the following days belongs to the next phase of the offensive.
Background
After two failed attacks on Gaza, in March and in April 1917, the Turks turned the line from the sea at Gaza to Beersheba into a chain of fortified positions. Gaza was its strongest point, Beersheba its advanced left wing. In the summer the commander of Eastern Force, Lieutenant-General Sir Philip Chetwode, and his chief of staff Guy Dawnay concluded that another frontal attack on Gaza made no sense. They proposed turning the Turkish line from the east: take Beersheba, then strike the left wing of the main position at Tel esh Sheria and Hureira. Allenby, who had replaced Archibald Murray in June, based his plan on this assessment. On 22 October he issued the orders for the offensive.
The plan had one weak point: water. Within a radius of a dozen or so kilometres around Beersheba there was almost none. The town itself, whose Arabic name Bir as-Sab is sometimes translated as “Seven Wells”, stood on numerous wells. Several tens of thousands of men and more than ten thousand horses could therefore go on fighting only if Beersheba fell on the first day and its wells and pumps were captured intact. That is why, as Falls writes, the whole further operation depended on taking the town quickly.
The British tried to make the Turks expect the main blow against Gaza. On 10 October an officer of Allenby’s staff, pretending to be wounded, dropped in front of a Turkish outpost a haversack of false documents, according to which the main attack was to go in against Gaza and the advance on Beersheba was to be only a feint. The ruse is usually attributed to Major Richard Meinertzhagen, although some historians question his authorship. According to Falls the ruse worked: the Turks began to fortify their right wing more intensively, and in the second half of October they exchanged one of the regiments at Beersheba for a regiment from Tel esh Sheria, strengthening the right wing at the expense of the centre of the line. On 27 October the bombardment of Gaza from land began, and from 29 October also from ships, which further convinced the commander of the German-Turkish Eighth Army, the Bavarian general Friedrich Kress von Kressenstein, that the main blow would fall on Gaza.
From 21 October Chetwode’s XX Corps and Lieutenant-General Harry Chauvel’s Desert Mounted Corps moved east by night. By day the troops hid in the beds of wadis, fires were lit in abandoned camps, and the sappers rebuilt the wells at Khalasa and Asluj, south of Beersheba, which the Turks had filled in. By the evening of 30 October about 12,000 men and as many horses had gathered there. The Turks knew of the movements, but to the end they believed them to be only feints.
Forces
Beersheba was defended by the Ottoman III Corps under İsmet Bey, the future president of Turkey İsmet İnönü. He had at his disposal the 27th Division, made up of two mostly Arab regiments, the 48th Regiment from the 16th Division, the 2nd Regiment from the 24th Division and the 3rd Cavalry Division. According to Falls the garrison numbered about 5,000 rifles and sabres, 60 machine guns and 28 guns, while other studies give about 4,400 rifles. The trenches to the west and south of the town were well laid out and deep, but poorly protected by barbed wire, which was in short supply throughout Palestine. On the east side of Beersheba almost no one had dug in, because the Turks did not believe that large mounted forces would venture so far from water. The key to the defence on that side was the hill of Tel el Saba, about 5 kilometres east of the town.
Against them Allenby sent a large part of his army. XX Corps was to attack from the west: Major-General John Shea’s London 60th Division and Major-General Eric Girdwood’s 74th Division, made up of dismounted yeomanry regiments. On the left flank they were covered by the Welsh 53rd Division. The Desert Mounted Corps was to strike from the east: Major-General Edward Chaytor’s Anzac Mounted Division, Major-General Henry Hodgson’s Australian Mounted Division (formerly the Imperial Mounted Division) and the British 7th Mounted Brigade. At Beersheba the British had a superiority of several times over.
Course
The night. On the evening of 30 October both mounted divisions set off from Asluj and Khalasa. The Anzac Mounted Division had about 40 kilometres to cover, the Australian Mounted Division nearly 50, over stony, trackless hills. Each horseman carried rations and fodder for several days. In the morning both divisions stood east and south-east of the town, having met no serious resistance on the way. According to Falls the appearance of two cavalry divisions in the east took the Turks completely by surprise.
The infantry attack. At 5.55 a.m. the XX Corps artillery opened fire on the trenches west and south-west of the town. There was no wind, so after an hour the targets vanished in a cloud of dust and the bombardment had to be suspended for a while. At 8.30 a.m. the London 181st Brigade took the advanced works on Hill 1070, capturing 90 prisoners. At 12.15 p.m. four brigades of the two divisions moved off for the main assault and before 1 p.m. had taken all their objectives. The hardest fighting fell to two battalions of the Royal Welsh Fusiliers of the 74th Division. Corporal John Collins, who killed fifteen Turks with the bayonet, received the Victoria Cross. In the evening the 74th Division also occupied the already abandoned trenches north of the Wadi es Saba. That day XX Corps took 419 prisoners and 6 guns. The capture of the town itself, however, was left to the cavalry, which needed its water.
Tel el Saba. In the east Brigadier-General William Meldrum’s New Zealand Mounted Rifles Brigade attacked the hill of Tel el Saba at 9.10 a.m. Its flat, boulder-strewn top and steep slopes gave the battalion defending it, with a machine-gun company, an excellent field of fire over the whole plain. The Australian 2nd Light Horse Brigade quickly cut the road to Hebron, but further on it was held up by Turkish cavalry in the hills. The New Zealanders advanced slowly, in short rushes, supported by the Australian 1st Light Horse Brigade and batteries of horse artillery. German aircraft bombed the horses and command posts. Only at 3 p.m. did the Auckland Mounted Rifles Regiment take Tel el Saba. Evening was approaching, and Beersheba was still in Turkish hands.
The charge. Chauvel considered using the British 5th Mounted Brigade, the only one armed with swords, but it stood further from the town. He chose Brigadier-General William Grant’s Australian 4th Light Horse Brigade. “Put Grant straight at it,” he is said to have ordered Hodgson. At the same time Allenby, worried by news of a possible withdrawal of the cavalry to the watering places, told Chauvel that he must take Beersheba that day. According to Gullett, however, the orders for the charge had been issued before the message arrived. After 4.30 p.m. the 4th and 12th Light Horse Regiments, from Victoria and New South Wales, set off at a trot and soon at a gallop, in three waves, with gaps of several metres between the riders. They had no swords, so the men held bayonets in their hands. The sun set just after the advance began.
The Turkish artillery fired from a distance and inaccurately, and the machine guns on the left flank were silenced by a British horse artillery battery. The Turkish infantrymen, surprised by the speed of the charge, according to Gullett failed to adjust their sights, and the riders covered the last few hundred metres almost without loss. The 4th Regiment jumped a shallow trench and the main ditch, after which some of the men dismounted and fought with bayonets in the trenches. Most of the 12th Regiment raced through a gap in the Turkish line and galloped straight into the town, taking prisoners and guns on the way. According to a Turkish account, İsmet Bey had already ordered a retreat to the north and the destruction of the wells at 4 p.m., but the charge forestalled the sappers. Most of them fled without firing the prepared charges, and the corps commander himself slipped away on foot at the last moment. The 11th Regiment, following the charging regiments, intercepted in the town about 400 Turks withdrawing from the western trenches. By 6 p.m. the Australians and New Zealanders had occupied Beersheba and the surrounding hills, and shortly afterwards the 7th Mounted Brigade entered the town.
Losses
The British lost relatively few men at Beersheba. According to the official history XX Corps had 136 killed, 1,010 wounded and 5 missing, and the Desert Mounted Corps fewer than 200 killed and wounded. The regiments of the 4th Light Horse Brigade alone lost, according to Gullett, 31 killed and 36 wounded. Popular Australian accounts state that about 70 horses fell in the charge. The Turks lost more than half the infantry defending the town. The Desert Mounted Corps took 70 officers and 1,458 men prisoner, and the army as a whole almost 2,000 prisoners and 15 of the 28 guns. The numbers of Ottoman killed and wounded are uncertain. Only the 3rd Cavalry Division withdrew without losses.
Significance
The capture of Beersheba on the first day opened the way for Allenby to turn the Turkish line. Kress, who had not believed İsmet’s reports and had sent him no reinforcements, then made another mistake: he decided that the British would take the road through Hebron to Jerusalem, and moved part of his reserves from Gaza to the east. The wells of Beersheba were not enough for all the horses, however, and the rainwater in the nearby wadis quickly dried up, so the next blow had to be postponed for several days. In the meantime there was heavy fighting for Tel el Khuweilfe north of the town. On 6 November XX Corps broke through the positions at Tel esh Sheria, on the night of 6/7 November the Turks abandoned Gaza, and on 9 December Jerusalem surrendered.
Falls considered that the charge of the 4th Brigade had an enormous effect on the morale of both sides. The British cavalry commanders became convinced that on this front a mounted attack could succeed even against entrenched infantry, and yeomen with swords repeated it in November at Huj and El Mughar. According to Gullett, the Turkish commander reported on the night after the battle that his men had fled because they were “terrified of the Australian cavalry”.
In Australia the charge became a legend, perpetuated in the films Forty Thousand Horsemen (1940), made by Charles Chauvel, the general’s nephew, and The Lighthorsemen (1987). It is often called “the last great cavalry charge in history”, which is an exaggeration. The Australian Light Horse was in fact mounted infantry, and cavalry charges still took place later in this war and in the next one. Gullett also pointed out that only 400–500 riders came to grips with the Turks in the charge, and that its success was made possible by the day-long attack of the infantry and the New Zealanders. Beersheba today has a Commonwealth war cemetery, and on 31 October 2017 the centenary commemorations of the battle brought there the prime ministers of Australia and Israel and riders in Light Horse uniforms who re-enacted the charge.
Spotted a mistake?Report an error