1915: The Dardanelles
Second Battle of Krithia
- Dates:
- 6–8 May 1915
- Front:
- Middle East
- Location:
- Southern part of the Gallipoli peninsula, between Cape Helles, the village of Krithia (today Alçıtepe) and the hill of Achi Baba, Ottoman Empire (today Turkey)On the battle map →
- Sides:
- United Kingdom, France, Australia and New ZealandIan Hamilton, Aylmer Hunter-Weston, Albert d'AmadeOttoman EmpireOtto Liman von Sanders, Erich Weber
- Result:
- Ottoman defensive victory. The Allies advanced at most about 600 yards (550 metres) but took neither Krithia nor the hill of Achi Baba.
- Author:
- Łukasz Skowroń
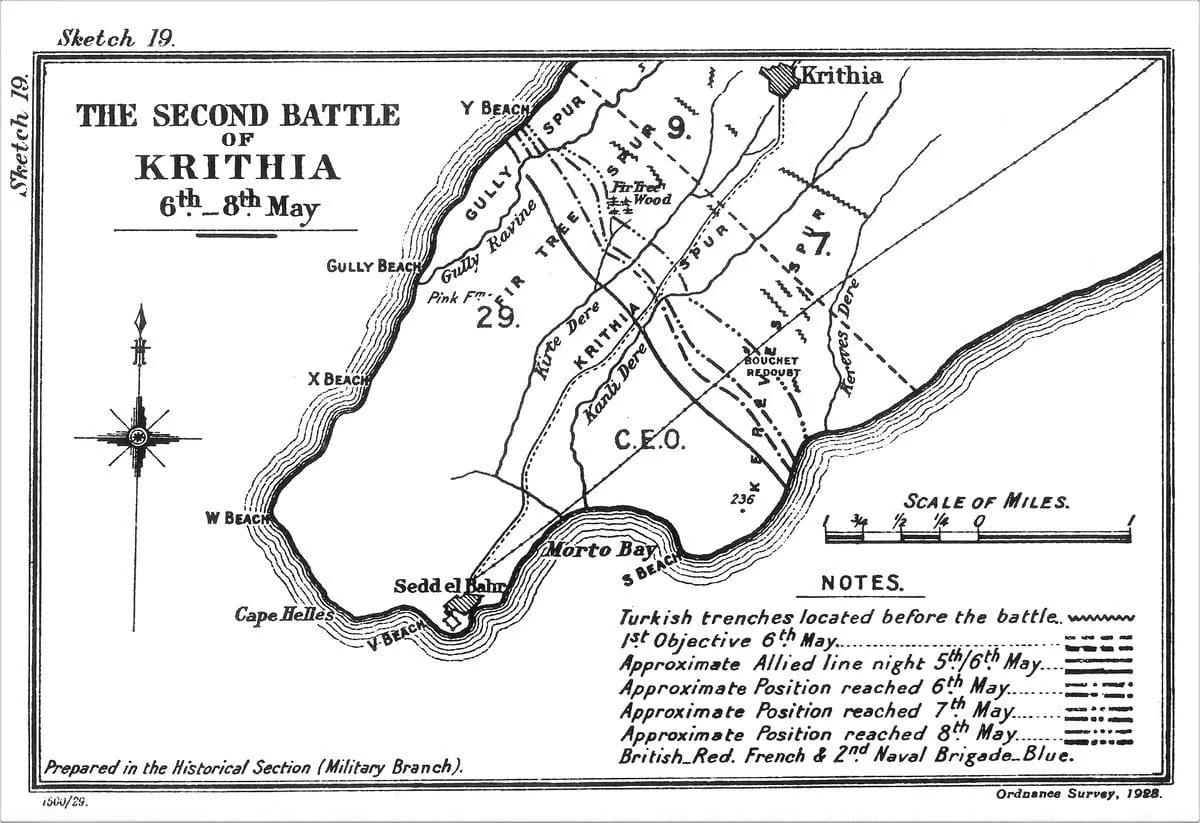
The Second Battle of Krithia was the Allies’ second attempt to break out of the bridgehead at Helles on the southern tip of the Gallipoli peninsula. From 6 to 8 May 1915 the British 29th Division, the French, a fresh Territorial brigade from Lancashire and two brigades brought over from Anzac Cove, one Australian and one New Zealand, attacked the village of Krithia and the hill of Achi Baba three times in a row in broad daylight. Artillery ammunition was short, and nobody knew exactly where the Turkish positions were. The attacks came to a halt in front of unseen machine guns. After three days the front had moved a few hundred metres, and the Allies had lost about a third of the soldiers who took part in the fighting.
Name and dates
In British historiography the battle is called the Second Battle of Krithia, in Turkish İkinci Kirte Muharebesi. The village of Krithia, Kirte in Turkish, is today called Alçıtepe. The British official history dates the battle 6–8 May 1915, and that is the dating used on this page. The brigades from Anzac Cove arrived at Helles on the night of 5/6 May, and the last attack ended on the evening of 8 May. In Australia and New Zealand the fighting of 8 May is remembered separately, as the charge of the 2nd Australian Brigade and the attack across the Daisy Patch.
Background
After the First Battle of Krithia on 28 April the front at Helles came to a standstill. On the nights of 1/2 May and 3/4 May the Turks, under the German colonel von Sodenstern, went over to bayonet attacks themselves. They wanted to drive the invaders into the sea, as ordered by Enver Pasha. They suffered heavy losses and did not break the front, but they badly strained the French division, especially its Senegalese battalions. According to the British official history the French lost over 2,000 killed and wounded in this fighting. On 4 May General Albert d’Amade reported that his Zouaves and the men of the Foreign Legion were at the end of their strength, and part of his sector was taken over by battalions of the British Royal Naval Division.
General Ian Hamilton wanted to strike as soon as possible, before the Turks brought up more divisions and built a continuous line of trenches. Lord Kitchener urged him on from London. Everything at hand was gathered at Helles. General Aylmer Hunter-Weston’s 29th Division, so depleted that one of its brigades had been broken up, was joined by the 125th Brigade of the 42nd (East Lancashire) Division, made up of Territorial battalions of the Lancashire Fusiliers that had arrived from Egypt on 5 May, and by the 29th Indian Brigade. From Anzac Cove General William Birdwood gave up two brigades: Colonel James McCay’s 2nd Australian Brigade, about 2,300 men strong, and Colonel Francis Johnston’s New Zealand Brigade, about 2,700 strong. Together with an improvised brigade of two Royal Naval Division battalions they formed the Composite Division under General Archibald Paris. The 2nd Naval Brigade remained with the French, and General Maurice Bailloud’s French 2nd Division was just beginning to come ashore. In all the Allies had about 25,000 bayonets.
On the Turkish side Sodenstern, lightly wounded according to Liman von Sanders, was replaced at the beginning of May by another German, Erich Weber, known as Weber Pasha, who had until then commanded the troops on the Asian shore of the strait. According to Turkish figures the southern group numbered 29–31 battalions of the 9th and 7th Divisions, into which units from several other divisions had been mixed, and 56 guns. The British official history estimates its strength at about 20,000 men; some Turkish accounts speak of as few as 15,000. According to these accounts Weber, seeing the exhaustion of the troops and the devastation caused by the ships’ fire, proposed a withdrawal behind the Achi Baba ridge. General Otto Liman von Sanders, commander of the Fifth Army, refused and ordered every inch of ground to be defended and the troops to dig in as close to the enemy as possible, where the ships’ fire was less dangerous. The Turkish positions at that time consisted of loose sections of trench and forward machine-gun nests hidden in scrub and gullies. There was no barbed wire in front of them.
Plan
Hamilton wanted to attack before dawn, but Hunter-Weston persuaded him that, having lost most of its company commanders, the 29th Division could not manage an attack in the dark. It was therefore decided to attack by day. The Allies, however, had nothing with which to prepare the attack. The land artillery had already used up more than half its stock of shells, and the British field guns fired only shrapnel, which was ineffective against trenches. The ships too had to save ammunition for a future forcing of the strait. When Hamilton reported that the shortage of shells was becoming very serious, the War Office replied that supplies had not been calculated for a long stay on the peninsula and that he must push on.
The order for 6 May was similar to the plan of 28 April. The French were first to take the ridge above the Kereves Dere ravine and hold a “pivot” there, while the 29th Division was to wheel to the right, take Krithia and finally, together with the French, the hill of Achi Baba. It was hoped this could be done the same day. The ground was more difficult than it looked. Four gullies ran down from the slopes of Achi Baba to the sea, and the spurs between them were covered with scrub and clumps of pine in which a machine gun could easily be hidden. The naval air service had too few aircraft to reconnoitre the Turkish positions properly.
Course of the battle
6 May
The attack was to start at 11 a.m. After a short, weak bombardment, the 88th Brigade, whose five battalions had few officers left, advanced in the centre on the spur later named Fir Tree Spur. On the left flank, above the cliffs of the Aegean coast, the 125th Brigade set off at 11.30 a.m., and the French on the right flank only at 11.40 a.m. At first the Turks fell back, but after a few hundred metres the advance was stopped by fire from forward outposts and Turkish shrapnel. The Lancashire Fusiliers above the former Y Beach came under fire from machine guns hidden on the other side of a narrow ravine and did not move a step further. The 88th Brigade failed to get into Fir Tree Wood and at about 4 p.m. began to dig in. The French got furthest on the right flank, above the mouth of the Kereves Dere, but in the centre and on the left they were held up in front of newly discovered Turkish trenches. The Hood Battalion of the Royal Naval Division, which on its own initiative filled the gap to the left of the French, lost its commanding officer and had to withdraw. By the evening the front had moved forward by about 400 yards (just under 370 metres) on average. According to the British official history the Allies had fought only Turkish outposts, and the defenders’ main force had not entered the fighting.
7 May
Hamilton ordered the attack to be renewed at 10 a.m. the next day, to the same plan. A fifteen-minute bombardment achieved little. On the left flank the Lancashire Fusiliers again failed to take the machine-gun nest above Y Beach, although it was shelled by the battleships Swiftsure and Talbot and later also by the dreadnought Queen Elizabeth. The 88th Brigade in the centre briefly entered Fir Tree Wood, but at about 12.30 p.m. it was stuck no more than 300 yards from its starting positions. An evening attack by the 87th and 88th Brigades, preceded by another bombardment, did not change the situation. The French, reinforced by fresh units, at one point got to within about 150 yards of the ridge, but a Turkish counter-attack threw them back. According to the official history British losses that day were no more than 800 men. The 125th Brigade, which had lost about 650 men in two days, was withdrawn into reserve.
Morning of 8 May
Hamilton decided to try a third time. This time the weight of the attack fell on the New Zealanders. The bombardment began at 10.15 a.m., and at about 10.30 a.m. the Wellington, Auckland and Canterbury battalions advanced through the line of the 88th Brigade along Fir Tree Spur. The New Zealanders called the open field in front of them, covered in daisies, the Daisy Patch. The Canterbury Battalion advanced about 300 yards, Wellington 250, and the men from Auckland got to the far side of Fir Tree Wood but were driven out of it with heavy losses. At about noon the attack collapsed. The French on the right flank did not leave their trenches. D’Amade reported that his left flank would not advance until the British had taken Krithia, and that his right was pinned down by the fire of batteries on the Asian shore.
Evening of 8 May
Hamilton, who had come ashore that day and watched the battle from a command post on Hill 114 near Cape Helles, would not accept defeat. He knew he still had three brigades in reserve. At 4 p.m. he ordered the whole Allied line, reinforced by the Australians, to fix bayonets and advance on Krithia at 5.30 p.m. The order reached McCay shortly after 5 p.m. and came as a surprise to him. His brigade was in reserve about a thousand yards behind the front line. The 6th and 7th Battalions, followed by the 5th and 8th, first had to reach, under Turkish artillery fire, a British trench on Krithia Spur that the Australians called Tommies’ Trench. From there, with the cry “Come on, Australians!”, they went on across the bare, open ridge.
The heaviest artillery bombardment since the start of the campaign again mostly fell on empty ground, because nobody knew where the Turks were. On the left flank men of the South Wales Borderers fell in rows as soon as they left their trenches. The New Zealanders of Wellington and Auckland advanced about 400 yards and fell back with heavy losses. The Australians gained about 500 yards before fire from both flanks and from the scrub pinned them to the ground. According to the British official history, within half an hour the brigade lost over a thousand of the roughly two thousand men who took part in the attack. McCay and both his staff officers were wounded. The official historian called the charge “an unacknowledged Balaclava”.
The French advanced at about 6 p.m., with drums and bugles sounding the charge. For a moment it seemed to observers that they had taken the whole ridge, but the Turkish artillery covered it with fire and the left wing and centre fell back. Only a section of Turkish trench taken in a counter-attack was held; it was later turned into a strongpoint named the Bouchet Redoubt, which the French did not give up until the end of the campaign. At 7 p.m. the order was given to dig in on the positions reached. After dark, British battalions that were to connect the exposed right flank of the Australians with the rest of the front crossed without loss the strip of ground for which the Australians had paid with a thousand men. The Turks did not counter-attack.
Casualties
According to the British official history Allied losses over the three days were about 6,500 killed, wounded and missing, nearly 30 per cent of the soldiers who took part in the fighting. The 2nd Australian Brigade lost over a thousand men, and the New Zealand Brigade, according to New Zealand studies, about 800. The British official history gives no Turkish losses, noting that for the first two days only the defenders’ forward units were fighting. Some studies, including Turkish ones, mention about 2,000 killed and wounded on the Ottoman side. These figures should be treated as approximate.
Significance
On the evening of 8 May Hamilton telegraphed Kitchener that the operation had failed because the Turkish entrenchments and machine guns were too strong to be carried by assault. In reality, as the British official history established after the war, the Turkish positions were not yet a continuous line of trenches and had no barbed wire. The main cause of the defeat was attacking by day, without sufficient artillery support, against unreconnoitred machine-gun positions. The British were learning the same lesson in France in those same days. In addition, orders reached the battalions late, and attacks that were meant to be simultaneous were carried out piecemeal.
The battle closed the first stage of the campaign. The hope that small forces with a limited stock of ammunition would reach the Narrows was gone. Hamilton’s troops had few fresh battalions left, the field hospitals were overflowing with wounded, and the stock of shells was almost exhausted. Hamilton asked for reinforcements and Kitchener promised him one division. At Helles trench warfare began, and the Allies made their next attempt to take Krithia only on 4 June. Neither the village nor the hill of Achi Baba was taken before the end of the campaign.
Spotted a mistake?Report an error