1915: The Dardanelles
Battle of Sari Bair
- Dates:
- 6–10 August 1915
- Front:
- Middle East
- Location:
- The Sari Bair ridge (Chunuk Bair, Hill Q and Hill 971) with the spurs and gullies running down to the sea north of Anzac Cove, and the 400 Plateau with the Lone Pine position and the Nek on the old Anzac bridgehead, Gallipoli peninsula, Ottoman Empire (today Turkey)On the battle map →
- Sides:
- United Kingdom, Australia, New Zealand and British IndiaIan Hamilton, William Birdwood, Alexander GodleyOttoman EmpireOtto Liman von Sanders, Esat Pasha, Mustafa Kemal
- Result:
- Ottoman defensive victory. The Australians held the trenches they had taken at Lone Pine and the front north of Anzac moved deeper into the hills, but the Sari Bair ridge stayed in Turkish hands.
- Author:
- Łukasz Skowroń
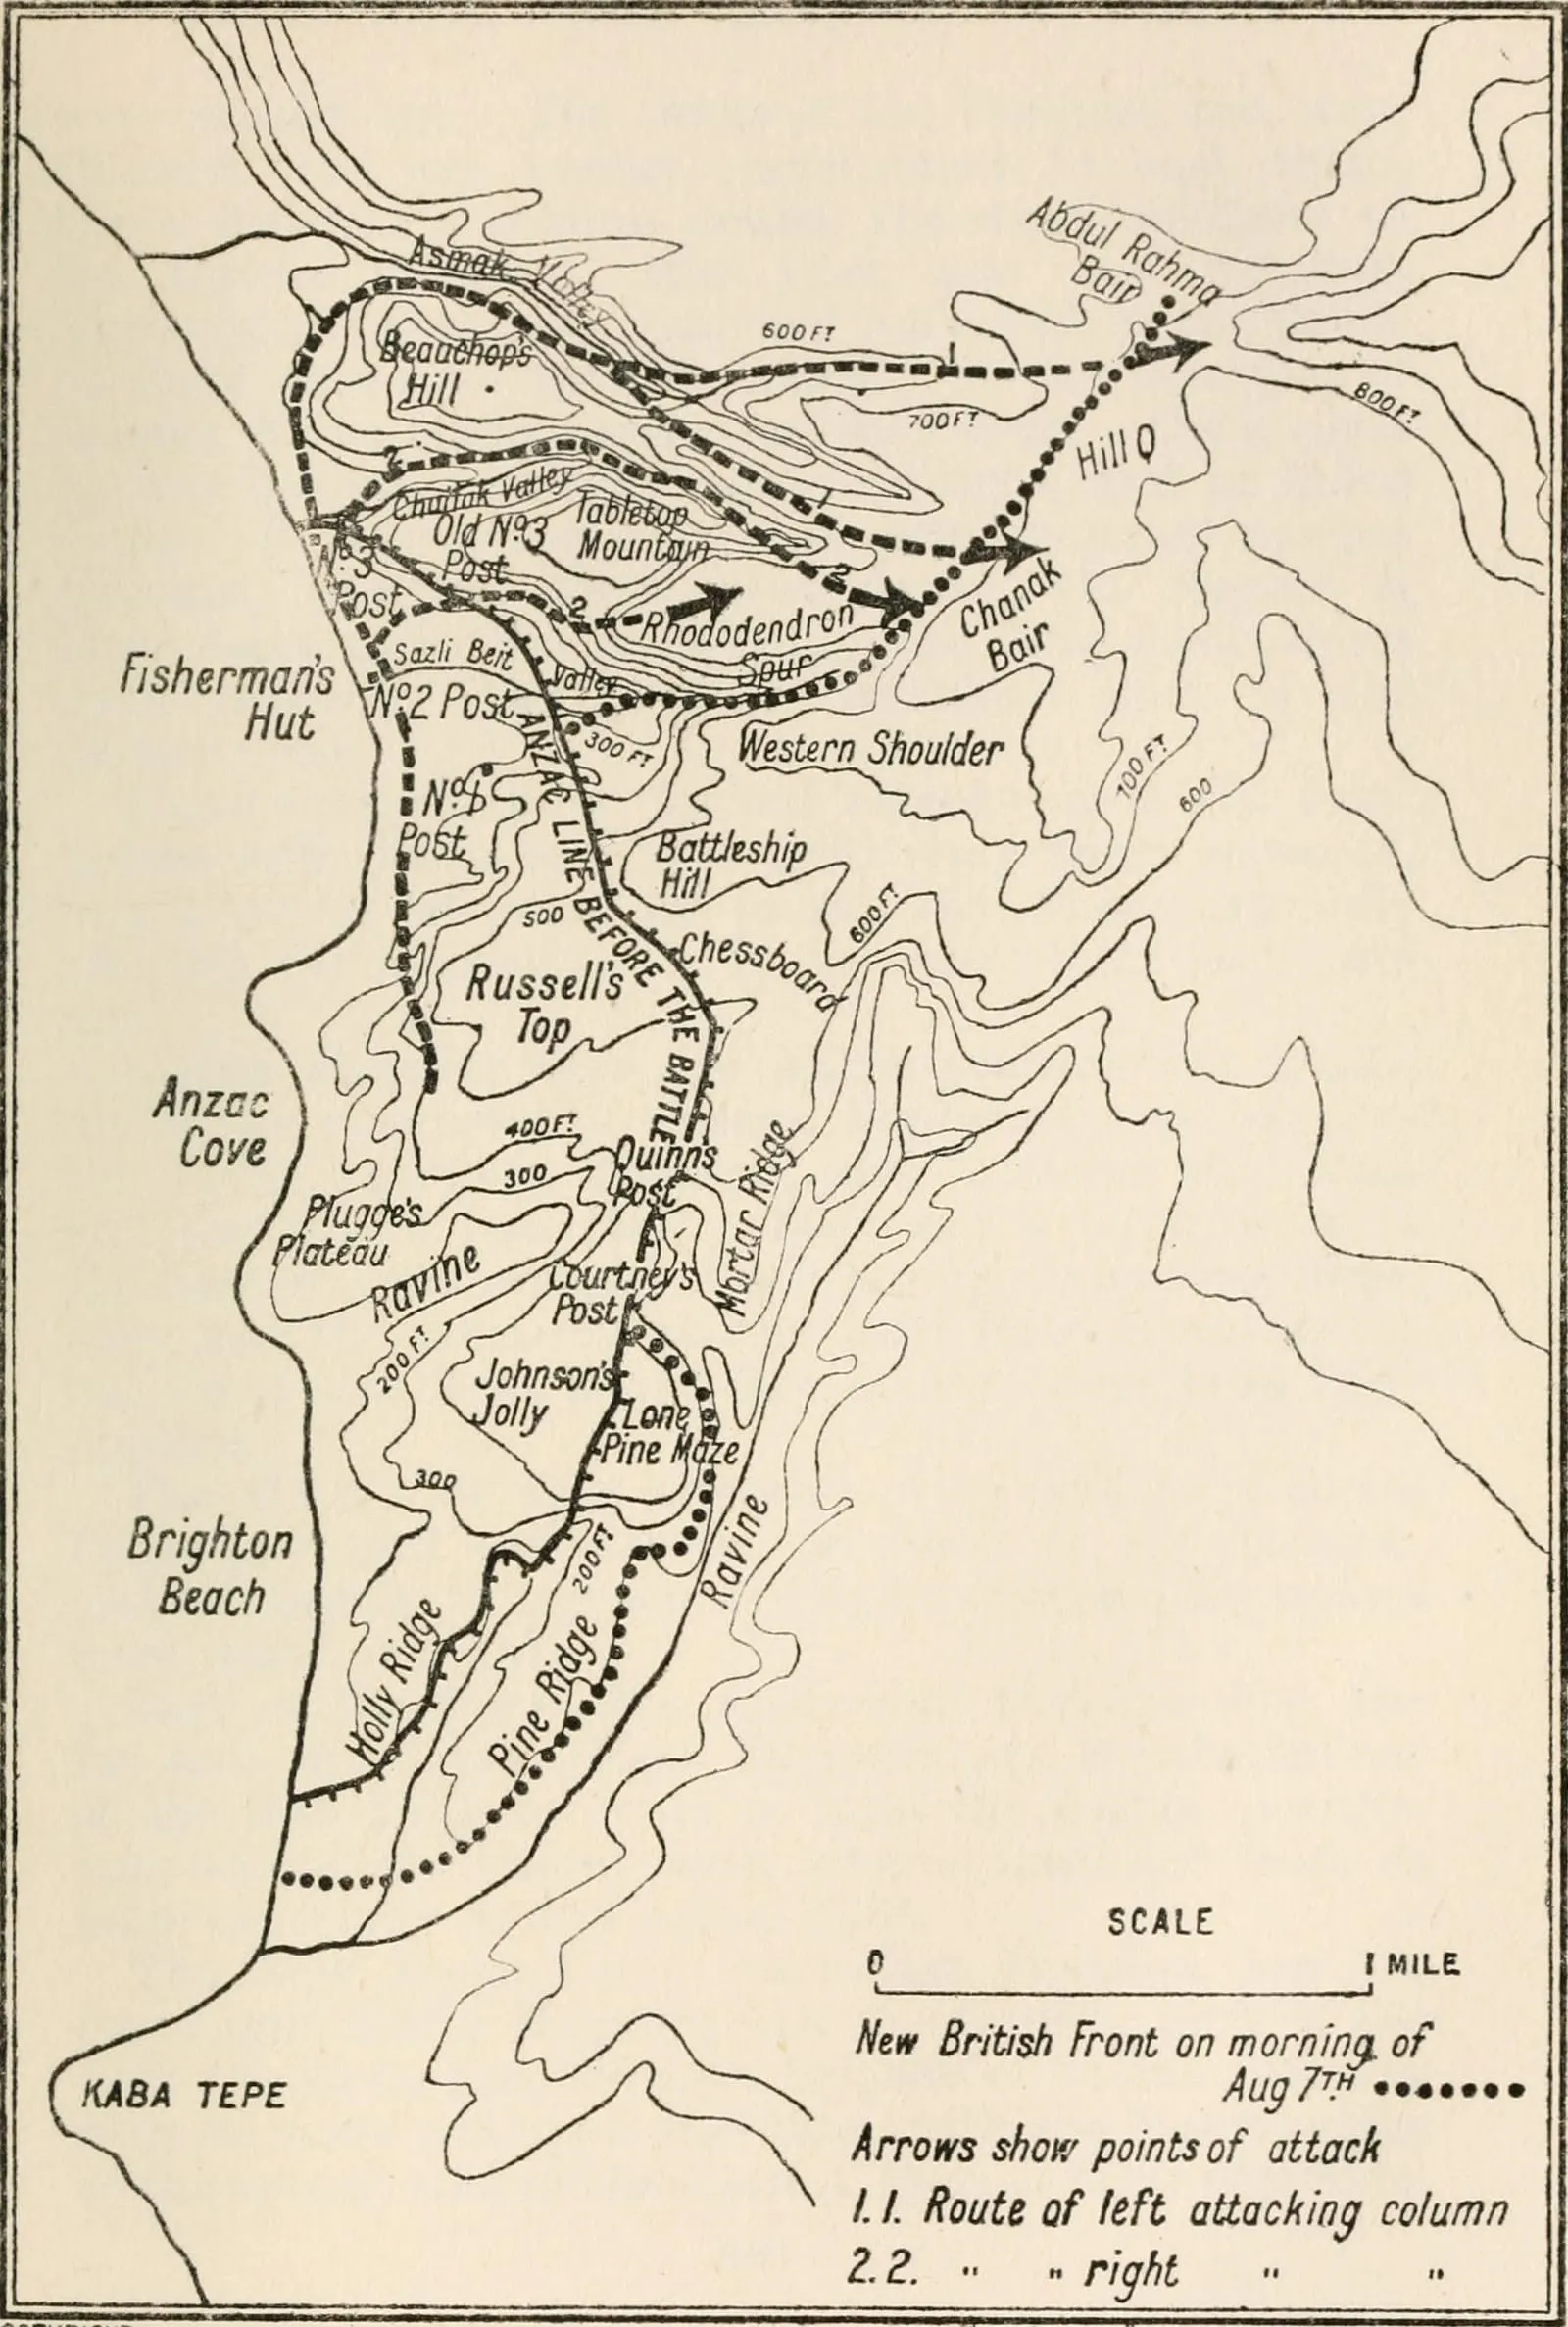
The Battle of Sari Bair was the main part of the great Allied August offensive on the Gallipoli peninsula and the moment when the expedition to the Dardanelles came closest to victory. From 6 to 10 August 1915 General William Birdwood’s reinforced Australian and New Zealand corps tried to break out of the bridgehead at Anzac Cove and take the Sari Bair ridge (Turkish: Sarı Bayır), the highest hills in the central part of the peninsula, from which the Narrows of the Dardanelles could be seen. The Australians took the Turkish trenches at Lone Pine in a bloody fight, night columns went through the wild, scrub-covered gullies north of Anzac, and New Zealanders and Gurkhas briefly stood on the crest of the ridge. Delays, guides’ mistakes, the exhaustion of the troops and the swift arrival of Turkish reinforcements meant, however, that on 10 August a counter-attack led by Colonel Mustafa Kemal drove the Allies off the hills. They never took the ridge or the Narrows for the rest of the campaign.
Name and dates
British lists of battles call this fighting the Battle of Sari Bair and date it to 6–10 August 1915. So does Aspinall-Oglander’s British official history, which writes of a “four days’ battle of Sari Bair” ending on 10 August. On this page we also describe two actions that are remembered separately in Australia and New Zealand: the Battle of Lone Pine, begun on the afternoon of 6 August as a diversionary attack, and the failed charge of the Australian Light Horse at the Nek on the morning of 7 August. The Turks speak of the fighting at Conkbayırı (Chunuk Bair) and Kanlısırt (“Bloody Ridge”, their name for Lone Pine) and of the battles of Anafarta. Times are given in local time, and place names mostly in the form given to them by the Australians and New Zealanders.
At the same time, on the night of 6/7 August, the British IX Corps landed a few kilometres further north, at Suvla Bay. That landing and the fighting at Helles, where on 6 and 7 August the British made a feint attack towards Krithia, were part of the same offensive, but we describe them separately.
Background
After the landing of 25 April the Australians and New Zealanders were stuck in the bridgehead at Anzac Cove, a narrow strip of steep ridges where no spot lay more than a few hundred metres from the Turkish trenches. At Helles successive attacks on Krithia, from the Second Battle of Krithia to the fighting at Gully Ravine, gained little ground at the cost of huge losses. As early as 30 May Birdwood proposed another way: to outflank the Turkish positions from the north, through the almost undefended hills by the sea, and climb onto the Sari Bair ridge in a night march. From its summits, Chunuk Bair (Turkish: Conkbayırı), Hill Q (Turkish: Besim Tepe) and the highest, Hill 971 (Turkish: Kocaçimen Tepe), the troops could descend on the rear of the Turks defending Anzac and open the way towards the Narrows.
General Ian Hamilton made this idea the basis of the August plan. At the beginning of June the Dardanelles Committee granted him three divisions of the New Army, the volunteer formations raised from August 1914, and later two more Territorial divisions. Some of them were to reinforce Birdwood, and the rest were to land at Suvla Bay, seize the hills there and prepare a base for the winter. The attack was set for the night of 6/7 August, because the moon would then rise only about two hours after midnight. Over several moonless nights before the offensive about 25,000 men of the British 13th Division, one brigade of the 10th Division and the 29th Indian Brigade were secretly shipped to the Anzac beaches. By day they hid in dugouts and gullies cut into the slopes. In this way Birdwood had about 37,000 men and 72 guns.
The Turks did not know where the blow would fall. General Otto Liman von Sanders, commander of the Fifth Army, kept strong reserves at Bulair at the neck of the peninsula and on the Asian shore of the strait. Facing Anzac was the Northern Group of Esat Pasha, about 20,000 men of the 19th, 16th and 5th Divisions. Most of them held trenches between Battleship Hill and the 400 Plateau. According to the British official history there were only two battalions in the northern hills, and the ridge itself north of Battleship Hill was almost empty. Liman had, however, recently ordered a road built behind its crest from Büyük Anafarta to Hill 971 and on towards Chunuk Bair.
Plan
Birdwood was to strike first on the right flank, to draw the Turkish reserves there. On the afternoon of 6 August the 1st Australian Brigade was to take the strongly fortified Lone Pine position on the southern part of the 400 Plateau. After dark, on the northern flank, the New Zealand mounted rifles and two New Army battalions were to take the Turkish outposts at the mouths of the gullies in silence. Behind them two assault columns of General Alexander Godley’s New Zealand and Australian Division, which with attached units numbered about 20,000 men, were to set off. The right column of General Francis Johnston, the New Zealand Infantry Brigade, was to go up the Chailak Dere and Sazli Beit Dere gullies onto Rhododendron Ridge and from there to Chunuk Bair. The left column of General Herbert Cox, General John Monash’s 4th Australian Brigade and the 29th Indian Brigade, about 5,000 men in all, was to take a longer route, through the Aghyl Dere valley, to Hill Q and Hill 971. The summit was to be taken before dawn, and at 4.30 a.m. the New Zealanders from Chunuk Bair and the Australian Light Horse from the old bridgehead, across the Nek, were to attack Battleship Hill and Baby 700 together.
The plan was bold and relied on surprise. But it required a night march by heavily laden soldiers through winding, steep gullies covered with thorny scrub, over ground that had been only partly reconnoitred and for which good maps were lacking. Most of the men at Anzac, after three months in the bridgehead, were worn down by dysentery and poor food, while the New Army battalions and the Gurkhas had landed a few days earlier and had never seen these hills. After the war the British official history judged that the greatest mistake had been to set Hill 971 as an objective for the first night. Monash, who read that chapter shortly before his death, agreed with the author: the tasks of the left column were beyond the strength of the exhausted troops.
Course
6 August: Lone Pine
At 4.30 p.m. about 28 guns and the cruiser Bacchante began shelling Lone Pine. The Turkish trenches, 60–150 yards (55–140 metres) from the Australian ones, were in many places roofed with thick pine logs. At 5.30 p.m. three battalions of General Neville Smyth’s 1st Australian Brigade went into the attack in four waves, two from the exits of tunnels dug under no man’s land and two over the parapet. They crossed no man’s land quickly, but above the Turkish trenches the men were held up by the logs. Some fired through the gaps at the defenders below, others jumped in through holes in the roof or into the open communication trenches at the rear. In the half-dark, roofed galleries a fierce fight with bayonets and hand grenades followed. Within a quarter of an hour or so the Australians held the heart of the position.
All night and for the next two days the Turks of the 16th Division, reinforced by both regiments of the reserve 5th Division, counter-attacked again and again with grenades. The Australians, supported by further battalions, held the trenches they had taken. Seven of them received the Victoria Cross for this fighting. The heaviest fighting lasted until the morning of 8 August, and isolated Turkish counter-attacks were renewed for several more days. The attack did its job: Esat Pasha sent to Lone Pine all the reserves he had at hand and called up from Gaba Tepe two regiments of the 9th Division under the German Colonel Hans Kannengiesser. This last move, however, proved fatal for Birdwood’s plan. Kannengiesser, who had gone ahead of his troops, learnt around midnight that he would no longer be needed at Lone Pine. He was therefore at hand when in the morning Esat sent him north, towards Chunuk Bair.
Night of 6/7 August: the march of the columns
After dark about 2,000 New Zealanders of the Mounted Rifles Brigade, the Otago Regiment and General Andrew Russell’s Māori contingent set off against the Turkish outposts at the mouths of the gullies. One of them, Old No. 3 Post, they took thanks to a ruse prepared for weeks: every night at exactly 9 p.m. a destroyer lit it up with a searchlight and shelled it for half an hour, and the Turks had grown used to taking cover in their dugouts at that time. That night, when the shelling stopped, the men from Auckland were already under the parapet. By about 1 a.m. Destroyer Hill, Table Top and Bauchop’s Hill had fallen one after another. The commander of the Otago Regiment, Lieutenant-Colonel Arthur Bauchop, was mortally wounded. Further north two New Army battalions under General Travers took Damakjelik Bair and captured about 200 prisoners. All this, however, took about two and a half hours longer than planned.
The right column set off late, at about 11.30 p.m. The main body of Johnston’s brigade went up the Chailak Dere and by about 1 a.m. was only about 1,500 yards (1.4 kilometres) from the still empty summit of Chunuk Bair. The Canterbury battalion, which was moving up the neighbouring gully, lost its way, however, turned back and before dawn found itself back at its starting point. Johnston waited for it on the western shoulder of Rhododendron Ridge. The left column got stuck earlier. A local guide persuaded the officers who were to lead it to take, instead of the roundabout but easy route along the coast, a short cut through a narrow, overgrown defile, later named Taylor’s Gap. Fired on from the flanks by a few Turkish scouts, the column covered those 600 yards in three hours. At dawn Monash’s exhausted Australians halted on Damakjelik spur, believing they were already below Abdul Rahman Bair, which in fact was still about a kilometre away. The Gurkhas and Sikhs scattered in the tangle of gullies. Major Percy Overton, who was guiding the column and had spent weeks before the offensive reconnoitring these hills, was killed in the morning by a sniper’s bullet.
7 August: the Nek and the first attack on Chunuk Bair
Birdwood knew that the New Zealanders would not be in time to attack Battleship Hill from Chunuk Bair, but he did not call off the attacks from the old bridgehead, so as to pin the Turks in their trenches. At 4.30 a.m. 600 men of the 8th and 10th Regiments of the Australian Light Horse, fighting here on foot, charged in four waves across the Nek, a narrow ridge which near the Turkish trenches narrowed to about 25 yards (just under 25 metres). The artillery bombardment ended a few minutes early, probably because of badly synchronised watches, and the Turks had time to man their trenches. The first wave, led by the commander of the 8th Regiment, Lieutenant-Colonel Alexander White, fell within seconds under the fire of rifles and at least five machine guns. The next two followed it. According to Charles Bean’s Australian official history, the 8th Regiment lost 234 of 300 men, including 154 killed, and the 10th Regiment 138 men, of whom 80 were killed. According to a Turkish witness, the defenders did not lose a single man. Parallel attacks from Pope’s Hill and Quinn’s Post also broke down.
On Rhododendron Ridge Johnston moved off only at about 7 a.m. When his leading troops reached a knoll named the Apex, about 500 yards from the summit, the first shots rang out. Kannengiesser, who reached Chunuk Bair at about 7 a.m., found there, by his own account, only a sleeping battery and a handful of soldiers; he ordered them to open fire and stopped the tired New Zealanders. His regiments soon arrived. Johnston wanted to wait until dark, but Godley ordered an attack. At 10.30 a.m., after a short bombardment, three companies of the Auckland battalion and two companies of Gurkhas went up the slope and within a few minutes lost about 250 men, getting only as far as the knoll called the Pinnacle, 100 yards further on. On the left flank Cox’s column did not move from its position that day, and a New Army brigade sent to help it got lost in the gullies. Throughout that day the ridge between Battleship Hill and Hill 971 was held, by British estimates, by no more than 2,000 Turkish soldiers.
8 August: the New Zealanders on Chunuk Bair
Before dawn on 8 August Lieutenant-Colonel William Malone’s Wellington battalion, followed by the 7th Battalion, Gloucestershire Regiment and the 8th Battalion, Welch Regiment of the 13th Division, again set off for Chunuk Bair. To everyone’s surprise the summit was empty, apart from a sleeping machine-gun crew. For reasons never explained the Turks had withdrawn from their trenches. For the first time the New Zealanders saw the waters of the Narrows before them. When day broke, the Turks on Battleship Hill and Hill Q opened fire from both sides on the summit, where in the stony ground it was almost impossible to dig. The two companies on the crest and the forward slope were killed almost to the last man. The rest, under Malone, held out all day in shallow trenches on the reverse slope, beating off successive Turkish attacks with bayonet counter-charges. At about 5 p.m. Malone was killed, according to New Zealand researchers probably by a shell from his own artillery. After dark the battalion was relieved by the Otago Regiment and the Wellington Mounted Rifles. Of about 760 soldiers who had gone up to the summit in the morning, 711 were killed or wounded according to New Zealand figures. Corporal Cyril Bassett, who laid and repaired a telephone line under fire, received the only Victoria Cross awarded to a New Zealander at Gallipoli.
On the left flank the 4th Australian Brigade tried at dawn to attack Hill 971, but it climbed the wrong spur and lost more than 650 men under machine-gun fire. Cox’s other columns hardly moved. Only Major Cecil Allanson’s 1/6th Gurkha battalion, with a small detachment of the 6th Battalion, South Lancashire Regiment, climbed on its own up the slope of Hill Q and dug in about 30 metres below the crest. Meanwhile Turkish reinforcements were arriving. On the evening of 8 August Liman took command of the troops from Bulair, which were to attack at Suvla, away from their commander Fevzi Bey, because he had postponed the attack, and gave it to Mustafa Kemal, until then commander of the 19th Division. Kemal took over the Anafarta group, and soon he was responsible for the whole Turkish front north of Battleship Hill.
9 August: Hill Q
Godley planned a third attack for dawn. The main blow against Chunuk Bair and the ridge towards Hill Q was to be delivered by four fresh New Army battalions under General Anthony Baldwin. Led by New Zealand guides, however, the men got stuck during the night in the Chailak Dere, crowded with wounded and mules, came up against a cliff and had to turn back. At dawn they were still far from their objective. When the bombardment by ships and guns ended at 5.15 a.m., only Allanson attacked. The Gurkhas and the men from South Lancashire ran up onto the ridge, according to the Australian official history onto the saddle between Chunuk Bair and Hill Q, and drove the Turks down the other slope. For a short time the Allies stood on the crest of Sari Bair and, as Allanson recalled, saw below them the roads behind the Turkish army and the Narrows. A moment later several heavy shells fell among them. The men, convinced that their own guns were firing on them, fell back, and the oncoming Turks reoccupied the ridge. Where those shells came from is still unknown. According to the British official history the ships and the land artillery later maintained that they were Turkish shells, while Bean believed that Allied guns had fired them. Allanson was wounded, and his detachment lost more than 200 men.
Baldwin’s column reached the area of a farmstead called the Farm, on a ledge below the summit, only at about 6 a.m., when the Turks had already manned the ridge. Under fire it dug in on the edge of the plateau. On the northern flank the Turkish 7th Division, the first part of Kemal’s great counter-attack at Anafarta, struck Damakjelik spur at dawn. The 4th Australian Brigade and the 4th Battalion, South Wales Borderers drove it back, but the commander of the Welshmen, Lieutenant-Colonel Franklin Gillespie, was killed. Around noon Hamilton came by sea to Anzac and offered Birdwood his last reserve, the 54th Division. Birdwood declined, because he could not provide water and food even for the troops he already had, and asked for it to be sent to Suvla. During the night the shattered New Zealanders below Chunuk Bair were relieved by the 6th Battalion, Loyal North Lancashire Regiment and part of the 5th Battalion, Wiltshire Regiment.
10 August: Mustafa Kemal’s counter-attack
After personally reconnoitring Chunuk Bair, Kemal decided to retake the summit and drive the Allies off Rhododendron Ridge and the Farm. According to the British official history six battalions attacked; according to Turkish studies about 5,000 men from regiments of the 8th and 9th Divisions. Before dawn Turkish bombers wiped out the forward British posts, and at about 4.45 a.m. dense waves of infantry poured over the crest. The Loyal North Lancashire trenches were overrun, and about 500 men of the battalion went missing together with their commander. The Wiltshire companies, which were sleeping without their arms in a gully below, were taken by surprise and scattered. The Turks took the Pinnacle, but at the Apex they were stopped by the fire of New Zealand machine guns and of the ships. On the slope towards the Farm there was hand-to-hand fighting. Baldwin was killed, and General Richard Cooper, commanding the neighbouring brigade, was badly wounded. At about 10 a.m. the remnants of the British fell back from the Farm to Cheshire Ridge, and the Turks, bled white, returned to the ridge. Only the wounded and the dead remained at the Farm. According to Turkish tradition Kemal led the attack himself, and a shrapnel fragment was stopped by his pocket watch.
In the afternoon a battalion of the Connaught Rangers reoccupied the Farm, but after the loss of the Pinnacle the position was untenable and after dark the Irishmen withdrew. The new Allied line ran from the Apex along Cheshire Ridge to Damakjelik spur. Here the British official history ends the Battle of Sari Bair.
Losses
According to the British official history, Birdwood’s corps lost more than 12,000 killed, wounded and missing in four days of fighting, and Bean gives 12,000–13,000. At Lone Pine the 1st Australian Division lost, according to Bean, more than 2,000 men. The New Zealand Infantry Brigade lost about 1,700 killed and wounded on 6–10 August according to New Zealand studies. The New Army battalions paid for their lack of experience: the 7th Gloucesters lost about 350 men on 8 August, and all their officers and sergeants.
Turkish losses were just as high. According to Turkish figures cited by Bean, the defenders lost about 9,200 men at Chunuk Bair and Hill 971, 1,800–2,000 at Baby 700 and 6,930 in the 16th Division, mainly at Lone Pine, about 18,000 in all. More recent Turkish studies give more than 7,000 killed, wounded and missing for the fighting at Lone Pine. All these figures should be treated as approximate.
Significance
The Battle of Sari Bair decided the fate of the August offensive and, in practice, of the whole campaign. Until the morning of 9 August the Turkish situation was critical: the ridge on which the defence of the Narrows depended was in danger, and at Suvla it was defended only by a weak detachment. The British official history judged that a small smile of fortune could have tipped the balance. Birdwood’s plan failed not because of Turkish resistance on the first night, for there was hardly any, but because of mistakes on the march, the exhaustion of the troops, the heat and the lack of water, and also because of the inactivity of IX Corps at Suvla, which allowed Liman to move up reinforcements. Liman later wrote that if the Allies had held the summits of those hills, the whole front at Anzac would have had to fall back.
Until the end of August the British still tried to link the bridgeheads at Anzac and Suvla and to outflank the ridge from the north, but they never took Chunuk Bair, Hill Q or Hill 971. For Mustafa Kemal the August fighting, after his defence of Anzac in April, strengthened his fame as the commander who had saved the peninsula. In New Zealand Chunuk Bair became a place of remembrance like Lone Pine in Australia, and the Light Horse charge at the Nek was immortalised in 1981 in the film Gallipoli by Peter Weir.
Spotted a mistake?Report an error