1917: Flanders
Battle of the Menin Road Ridge
- Dates:
- 20–25 September 1917
- Front:
- Western Front
- Location:
- The Gheluvelt plateau on both sides of the road from Ypres (Ieper) to Menin (Menen), with Glencorse Wood, Nonne Bosschen, Inverness Copse and the western edge of Polygon Wood, and in the north the Zonnebeke ridge and the Gravenstafel and Poelkapelle spurs, West Flanders (Belgium)On the battle map →
- Sides:
- United Kingdom, Australia and South AfricaDouglas Haig, Herbert Plumer, Hubert Gough, William BirdwoodGerman EmpireRupprecht, Crown Prince of Bavaria, Friedrich Sixt von Armin
- Result:
- British victory. Within a few hours the attack took almost all its objectives to a depth of about 1–1.5 km, including Glencorse Wood, Nonne Bosschen and the edge of Polygon Wood. German counter-attacks collapsed under artillery fire.
- Author:
- Łukasz Skowroń
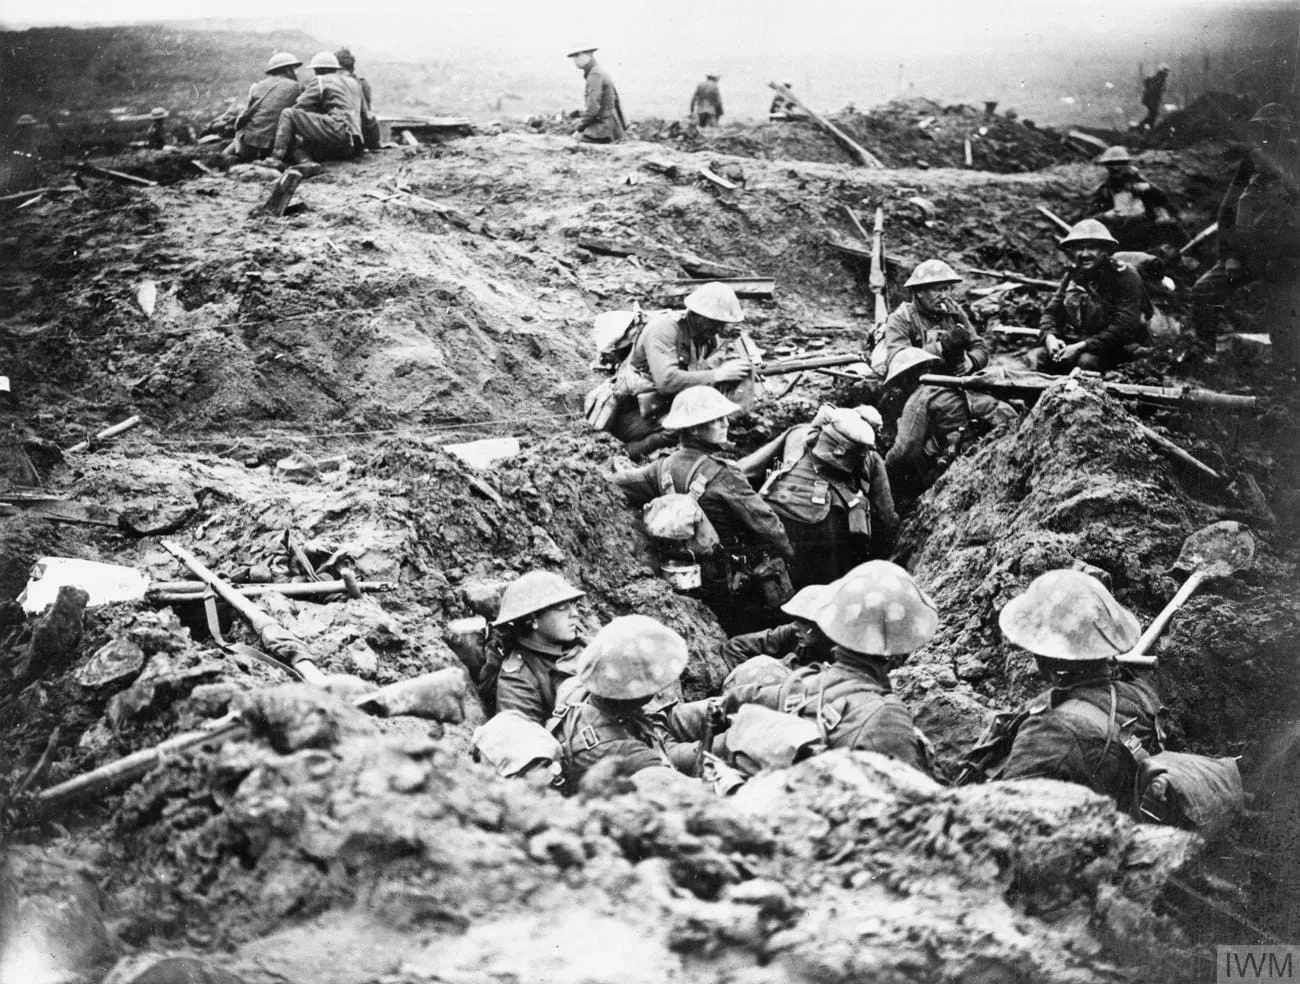
The Battle of the Menin Road Ridge was the third great attack of the Third Battle of Ypres and the first to be led by General Herbert Plumer. On 20 September 1917 at 5.40 a.m., in mist after a night of rain, eleven divisions of the British Second and Fifth Armies, two of them Australian, advanced behind the densest barrage yet seen on the Western Front. The objective was the Gheluvelt plateau beside the road from Ypres to Menin, for which General Hubert Gough’s Fifth Army had fought in vain throughout August. This time the objectives were set shallow, no more than a kilometre and a half deep, and the attack was divided into three bounds with long pauses for digging in. By 10.15 a.m. the Australians had taken Glencorse Wood and Nonne Bosschen and stood on the edge of Polygon Wood, and in the afternoon and evening artillery fire broke up the approaching German counter-attack divisions before they could reach the new line. Over the following days the Germans tried in vain to recover the ground, and on 25 September they struck hard south of Polygon Wood, on the eve of the next British attack.
Name and dates
The name Battle of the Menin Road Ridge and the dates 20–25 September 1917 were fixed after the war by the British Battles Nomenclature Committee, which counted it as the third of eight battles of Ypres in 1917. It covers the attack of 20 September and the local fighting of the five following days, including the German counter-attack of 25 September south of Polygon Wood. Australian writing speaks simply of the Battle of Menin Road. The name comes from the old road from Ypres to Menin (today Menen), which crossed the ridge at a spot the British called Clapham Junction. The road itself was by then no more than a strip of mud and shell holes, and of the village of Hooge only a cluster of mine craters remained. The Germans did not give this fighting a separate name and counted it as part of the Battle of Flanders.
Background
After the Battle of Langemarck and the failed August attacks on the Gheluvelt plateau, Field Marshal Douglas Haig on 25 August moved the army boundary northwards and gave the most important task to Plumer’s Second Army, the victor of Messines. Haig believed in success: he told a staff officer of I ANZAC Corps that if both ANZAC corps did their job, the Germans would have to abandon the Belgian coast, and that if the effort could be kept up through September, the Germans would be beaten. Plumer demanded three weeks for preparation. At a conference on 27 August the pause was proposed by the commanders of the two corps that were to bear the main burden, X Corps and I ANZAC Corps. Plumer also rejected any preliminary “straightening of the line” by small attacks. When Gough proposed at the beginning of September a preliminary attack in the Australian sector at Nonne Bosschen, the Second Army’s chief of staff replied: “Sir Herbert will not hear of it. Nothing before zero hour”. The Fifth Army’s attacks of 6, 7 and 10 September, meant to divert German attention, were unsuccessful.
The pause misled the Germans. The Crown Prince of Bavaria, Rupprecht, commander of the army group, noted on 12 September that the fighting in Flanders really seemed to be over and that some divisions could be withdrawn, and earlier he had believed rumours that the Australians were being moved to Egypt. His chief of staff, General Hermann von Kuhl, gave up two divisions, 25 artillery batteries and three fighter squadrons from the Fourth Army. When the British bombardment began on 15 September, Rupprecht judged it “probably only a demonstration”. Lower headquarters, up to the staff of the Fourth Army of General Friedrich Sixt von Armin, were however convinced from 17 September that an attack at Ypres was imminent.
Plan and forces
The method later called bite and hold had long been recommended by Haig’s staff, but this battle was the first to apply it in full. The Germans defended in depth: they held the forward zone with thin outposts and machine-gun nests in concrete shelters scattered in a chequerboard pattern, and kept the main strength back in order to strike the attackers with counter-attack divisions (Eingreifdivisionen) once they had gone far, exhausted and scattered. Plumer resolved to deny them this. The infantry was to advance at most about 1,400 metres, in three bounds (the red, blue and green lines), with an hour’s pause after the first and two hours after the second, and the strongest units were to go in the last and shortest bound and prepare at once for a counter-attack. Each successive line was taken by fresh battalions passing through those that had taken the previous one. Attacks were to follow at intervals of about six days, so as to take the whole plateau in four steps.
The artillery was the key. The Second Army received 1,295 guns, 575 of them heavy and medium, that is one gun for less than every 5 metres of the attack front. It also had three times as much ammunition as before the attack of 31 July, and the Fifth Army twice as much. The barrage was no longer a single line of explosions but a belt of fire about 900 metres deep: five successive lines of shells from field guns, howitzers, machine guns and heavy guns, moving ahead of the infantry by 100 yards (about 90 metres) every 4, then every 6 and 8 minutes. After each bound the further lines of the barrage swept about 1,800 metres forward to catch any counter-attack, and came back. For several days before the battle the artillery twice a day fired practice barrages, sometimes lasting more than an hour and a half, to train the gun crews and to teach the Germans that not every bombardment heralded an attack. The Royal Flying Corps assigned aircraft solely to watching for German counter-attacks.
The main blow, on a front of about 3.6 kilometres on the plateau itself, was delivered by General Thomas Morland’s X Corps (39th, 41st and 23rd Divisions) and General William Birdwood’s I ANZAC Corps, whose 1st and 2nd Australian Divisions attacked side by side for the first time in this war, each on a front of about 900 metres. The southern flank was covered by the 19th Division of IX Corps. In the north the Fifth Army advanced: V Corps with the 9th (Scottish) Division, in which a brigade from the Union of South Africa fought, and the 55th Division against the Zonnebeke ridge, XVIII Corps with the 58th and 51st Divisions against the Gravenstafel and Poelkapelle (PL) spurs, and the 20th Division of XIV Corps as northern flank guard. Facing the Australians stood the Prussian 121st Division and the Bavarian Ersatz Division, worn out by a long spell in the line, and behind them waited the counter-attack divisions: the 16th Bavarian at Gheluwe, the 236th at Moorslede and the 234th at Oostnieuwkerke.
Course of the battle
The night and dawn of 20 September. On the evening of 19 September it began to rain. Gough wanted to call off the attack, but the decision lay with Plumer, who after consulting his corps commanders and receiving the meteorologists’ assurance that the rain would not last long, kept to the date. The battalions moved at night along taped paths and formed up on the jumping-off tapes, in places 150 metres from the German outposts. At about 3 a.m. a captured officer of an Australian machine-gun company, who had lost his way in no man’s land, was brought to the headquarters of the German brigade facing the 2nd Australian Division. An attack order was found on him. The Germans alerted their artillery and counter-attack divisions, but it was too late for effective countermeasures. German shelling fell on some of the massed battalions of the 1st Australian Division in Château Wood and inflicted heavy losses on them before they had even moved off.
The first two bounds. At 5.40 a.m. all the artillery and machine guns opened fire. Mist and smoke hid the attackers, and the Germans, who had expected several hours of artillery preparation, mostly had no time to leave their shelters. Many surrendered waving bandages. The fighting came down to short clashes for individual concrete shelters, which were outflanked from behind and bombed with grenades. Lieutenant Frederick Birks of the 6th Battalion took a shelter in Glencorse Wood in this way, and in a sunken road on the northern edge of the wood Australians from Western Australia fought hand to hand with machine-gun crews for several minutes. The bog in Nonne Bosschen, where in November 1914 the British had stopped the Prussian Guard, was crossed along the rims of flooded shell holes. Between 5.57 and 6.09 a.m. the whole attacking line stood on the first objective, on schedule. At 7.08 a.m. the second bound began, and between 7.30 and 7.45 a.m. the Australians took the main German defence line (Wilhelmstellung) on the western edge of Polygon Wood, of which only chest-high tree stumps remained, as well as a spur with a concrete shelter known as “Anzac”. A Bavarian battalion commander surrendered from one of the shelters with his adjutant and 30 men.
The third bound and the rest of the front. At 9.53 a.m. the barrage moved on for the last few hundred metres, and at 10.15 a.m. the Australians were on the green line, while in the centre, where they were held up by their own artillery’s shells falling short, they reached it somewhat later. To their right the 23rd Division broke through Inverness Copse and the bunkers by the Menin road at Veldhoek, and the 19th and 39th Divisions took their objectives on the southern flank. The only serious failure in the Second Army was the Tower Hamlets spur, where the 41st Division got stuck in the valley of the Bassevillebeek stream under fire from fortified ruins known as the Quadrilateral. In the Fifth Army the 9th (Scottish) Division took Hanebeek Wood and Bremen Redoubt, the 58th Division took Wurst Farm on the Gravenstafel spur by a skilful outflanking move, with almost 300 prisoners, and the 51st Division came within sight of Poelkapelle. Things went worse for the 55th Division, weakened by its losses of 31 July, which fought until the afternoon for Hills 35 and 37, and for the 20th Division, held up in front of Eagle Trench.
Counter-attacks. At noon, when the mist lifted and the smoke cleared, the British and Australians had the sun at their backs and an excellent view over the plateau. The airmen sent 394 wireless messages that day, roughly one in three of which immediately brought down artillery fire. After 3 p.m. German infantry columns with guns were seen coming down from Broodseinde and Zonnebeke and moving along the Reutelbeek valley. These were the leading regiments of the counter-attack divisions, which had been trying since morning to get through the belt of shellfire. Every such movement drew a storm of fire: at about 6 p.m. in front of the 2nd Australian Division for forty minutes, and after 7 p.m. in front of the 1st Division for an hour. Under its cover no organised attack took place. According to Charles Bean, the Australian official historian, the strength of two German counter-attack divisions was used up in front of the ANZAC front before they could attack at all, and the Germans took their own barrage for the response to the British attack. Further north a counter-attack by the German 459th Regiment on Hill 37 was stopped by flanking fire, and an attack from the Poelkapelle spur pushed back the left flank of the 51st Division somewhat. By nightfall the counter-attack divisions had been repulsed everywhere.
21–24 September. At dawn the next day the barrage again swept the ground in front, and Australian patrols pushed posts forward into Polygon Wood. Private Reginald Inwood of the 10th Battalion, for a night reconnaissance and the capture of a machine gun, and Lieutenant Birks, who was killed by a shell on 21 September, for the fighting in Glencorse Wood, received the Victoria Cross. On 21 September a brigade of the 41st Division advanced to the Bassevillebeek, and in the evening the 55th Division recovered by counter-attack the ground lost on Hill 37. On 23 September the 20th Division, attacking from both ends, took Eagle Trench and 158 prisoners. On the nights of 21/22 and 22/23 September the Australian divisions that had taken the ridge were relieved, and their place was taken by the 4th and 5th Australian Divisions, preparing for the next step. On 21 September Haig issued orders for the next attack, for 26 September. The Germans could not accept the loss of the plateau. On 23 and 24 September Rupprecht wrote that the British must not be left the heights at Zonnebeke and Gheluvelt, and at the same time that he lacked reserves.
25 September. At 5.15 a.m. battery after battery, 44 field and 20 heavy, almost four times as much artillery as usually supported a German division, opened fire on the sector from the Menin road to Polygon Wood. The relief of the British 23rd Division by the 33rd Division had just been completed there. Two regiments of the German 50th Reserve Division attacked in the morning mist on both sides of the Reutelbeek stream. In the south, by the road, the Germans, supported by flamethrowers, broke into the forward posts but advanced only about a hundred metres. North of the stream they pushed back a Middlesex battalion and Scots of the Argyll and Sutherland regiment, retook several Wilhelmstellung shelters, advanced about half a kilometre and came out behind the right flank of the Australian 58th Battalion, which nevertheless held on at the edge of the wood. British and Australian counter-attacks did not recover all the ground. German fire blew up ammunition dumps prepared for the next day and inflicted heavy losses on the battalions that were to attack in the morning. Plumer nevertheless did not postpone the attack, and on 26 September the Battle of Polygon Wood began at the appointed hour.
Losses
The British official history (James Edmonds) gives 20,255 killed, wounded and missing from 20 to 25 September, including 3,148 killed. According to Bean the two Australian divisions lost 5,013 men (the 1st Division 2,754 and the 2nd Division 2,259), and the 19th Division 1,933. The British took 3,243 prisoners. Bean estimated that in the Australian sector the losses of both sides were roughly equal, because the successive lines held in case of counter-attack suffered from shellfire. The German official history gives for the Fourth Army about 25,000 killed, wounded and missing from 11 to 20 September, including 6,500 missing. Edmonds’s higher estimates of German losses have long been disputed.
Significance
The battle was the first real success of the Third Battle of Ypres. Within a few hours the British took Glencorse Wood and Nonne Bosschen, for which successive divisions of the Fifth Army had bled in August, and the German method of defence by counter-attack failed on a day when the Germans had been warned and had divisions ready to strike. The German official account admitted that the new English method of attack had proved its effectiveness, and that the loss of Nonne Bosschen and Glencorse Wood, so hard fought over, must have made a strong moral impression. Bean wrote that on that day the infantry was little more than a necessary adjunct to the artillery: the barrage won the ground and the infantry occupied it.
Some historians temper these assessments. Robin Prior and Trevor Wilson point out that despite the weather and the enormous artillery less ground was taken than on 31 July, that the cost in relation to the gains was higher, and that the success seemed greater against the background of the August defeats. John P. Harris stresses that the victory was decided by the threefold superiority of the British artillery, and that moving the guns forward weakened the bombardment enough for the Germans to prepare a methodical counter-attack on 25 September. The battle nevertheless opened a series of British successes that lasted until early October: on 26 September Plumer took Polygon Wood, and on 4 October the Broodseinde ridge. The Germans then began to change their method of defence by strengthening the forward zone, which at Broodseinde proved costly for them.
Spotted a mistake?Report an error