1917: Flanders
Battle of Polygon Wood
- Dates:
- 26 September – 3 October 1917
- Front:
- Western Front
- Location:
- The Gheluvelt plateau (Geluveld) from the Ypres–Menin road through Polygon Wood and Zonnebeke to the Gravenstafel spur, West Flanders (Belgium)On the battle map →
- Sides:
- United Kingdom and AustraliaDouglas Haig, Herbert Plumer, Hubert GoughGerman EmpireRupprecht, Crown Prince of Bavaria, Friedrich Sixt von Armin
- Result:
- British victory. The Australians and British took Polygon Wood, the Butte, a stretch of the Flandern I line and the approaches to Zonnebeke, and all German counter-attacks were repulsed.
- Author:
- Natalia
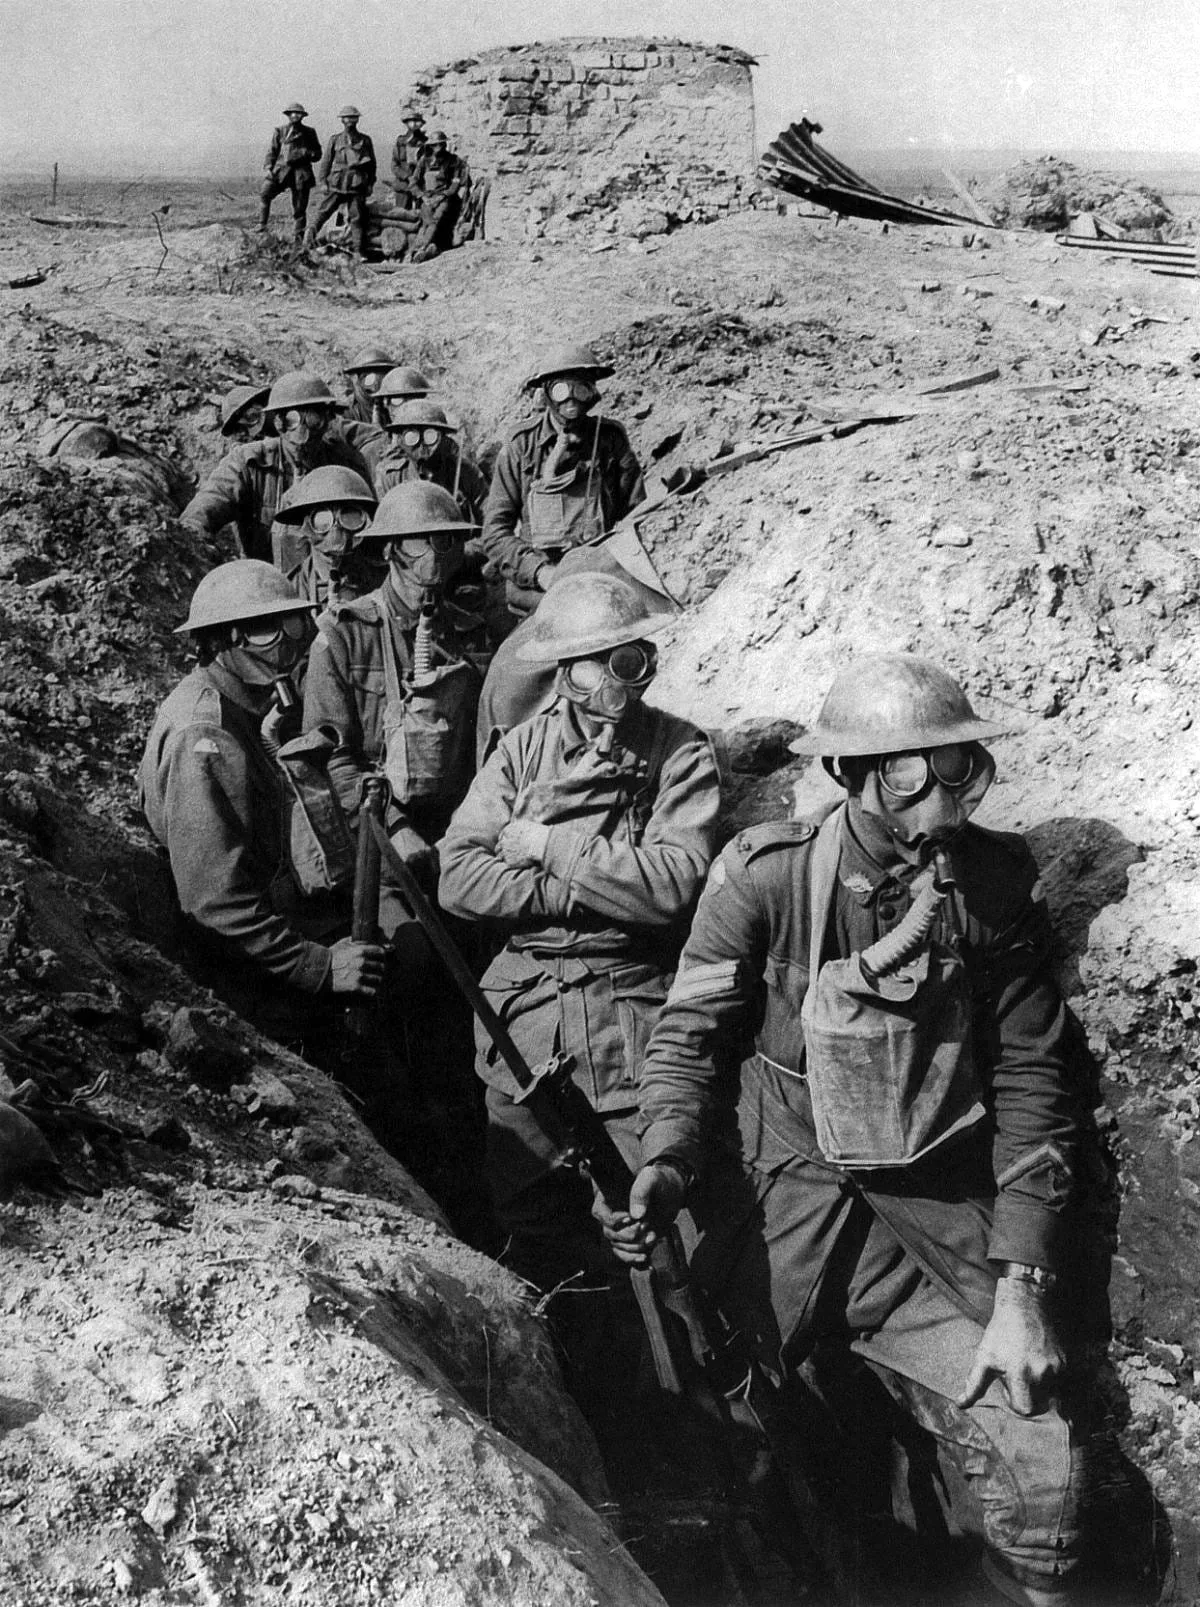
The Battle of Polygon Wood was the second of General Herbert Plumer’s three September–October “bites” in the Third Battle of Ypres. At 5.50 a.m. on 26 September 1917, six days after the Battle of the Menin Road Ridge, seven divisions, five British and two Australian, went forward behind a wall of fire on a front of about 8 kilometres, from the Ypres–Menin road to the Gravenstafel spur. The main task went to I Anzac Corps: the 5th Australian Division was to take the rest of Polygon Wood with the mound known as the Butte, and the 4th Australian Division the Tokio spur in front of Zonnebeke. Although a German attack the day before had nearly upset the whole operation, by noon almost all the objectives had been taken, and the counter-attacks of four German counter-attack divisions broke down under artillery fire. Further attempts to recapture the ground, up to 3 October, also failed. The battle forced the German command into another hurried change of defensive tactics.
Name and dates
The name and the dates, 26 September – 3 October 1917, were fixed after the war by the British Battles Nomenclature Committee, which counted this fighting as the fourth of the eight battles of Ypres in 1917. The attack proper lasted one day. Up to 3 October the committee also included the fighting for the last objectives on the right flank (27 September) and the German counter-attacks of 30 September and 1 and 3 October. The next day, 4 October, Plumer’s next attack began, at Broodseinde. The Germans counted this fighting as part of the Battle of Flanders (Flandernschlacht).
Polygon Wood (French Bois du Polygone) owed its name to the polygonal shape of a tree plantation about 7 kilometres east of Ypres. Before the war it had been a training ground of the Belgian Army: it had a track, probably left over from a former Belgian artillery school, which the soldiers called the “racecourse”, and in its eastern part a tall earth mound, the former butt of a rifle range, called in French the Butte de Polygone. There had already been fighting here in the autumn of 1914, in the First Battle of Ypres. By 1917 only tree stumps were left of the wood.
Background
After the failed August attacks of General Hubert Gough’s Fifth Army, Field Marshal Douglas Haig handed the capture of the Gheluvelt plateau to Plumer’s Second Army. Plumer ordered a three-week pause and decided to attack in short bounds, no more than a kilometre and a half deep, with an enormous mass of artillery and immediate consolidation of the ground taken. The first bound, on 20 September by the Menin road, succeeded almost completely. As early as 21 September Haig issued the order for the next: the Second and Fifth Armies were to advance on a front of about 7.8 kilometres, and General William Birdwood’s I Anzac Corps by about a kilometre, to take the rest of Polygon Wood and the southern edge of Zonnebeke. From these positions, no later than the beginning of October, the attack on the Broodseinde ridge was to be launched.
The hardest part was moving the artillery forward across the belt of shell-churned ground. Australian engineers, pioneers and tunnellers hastily built light railways and plank roads. According to the Australian official historian Charles Bean, every afternoon a train with 240 tons of planks arrived at a siding near Ypres, and at night 80 lorries and 120 horse-drawn wagons carried them forward, under fire and in the fumes of mustard gas. By 24 September the guns had been moved almost two kilometres forward. The weather was favourable: there had been no rain since 20 September, the ground had dried out, and in the early mornings mists covered the battlefield.
The Germans were drawing lessons too. On 22 September the command of General Friedrich Sixt von Armin’s Fourth Army decided to step up the shelling between attacks, speed up the counter-attacks and double their strength: behind each of the three divisions defending the plateau there now stood a counter-attack division (Eingreifdivision). On 25 September, on the orders of Crown Prince Rupprecht of Bavaria, the 50th Reserve Division, supported by almost four times the usual artillery, struck on the sector from the Menin road to Polygon Wood, where the British 33rd Division had only just relieved the 23rd Division. The Germans regained a few hundred metres of ground and several pillboxes south of the wood, on the sector from which the right flank of the Australians was to start the next day. Rupprecht, convinced that the next British attack would not come for several days, left that day for Munich on personal business.
Plan and forces
On the right flank, Lieutenant-General Thomas Morland’s X Corps was to take the rest of the Tower Hamlets spur south of the Menin road with the 39th Division, and with the 33rd Division to recapture the lost ground and cover the Australians from the south. In the centre I Anzac Corps attacked with two fresh divisions, which on the night of 22/23 September had relieved the 1st and 2nd Australian Divisions. General Talbot Hobbs’s 5th Division, rested after four months behind the lines, attacked with the 14th Brigade (from New South Wales) on the Butte and General Harold Elliott’s 15th Brigade (from Victoria) on the right flank. General Ewen Sinclair-Maclagan’s 4th Division, withdrawn from Messines only three weeks earlier, attacked with the 4th and 13th Brigades on the Tokio spur. The Australians were to reach the Butte and the Tokio pillbox, 800–900 metres from the start line, in two bounds, and after an hour’s pause go a little further, beyond the Flandern I line on the ridge. In the north the Fifth Army’s V Corps attacked with the 3rd and 59th Divisions on Zonnebeke and Hill 40, and a brigade of the 58th Division of XVIII Corps on the Gravenstafel spur.
I Anzac Corps had 205 heavy guns, one for about every 9 metres of front, as well as dozens of field batteries. The barrage moved forward in five layers, and ahead of the infantry there also went a barrage from 56 Vickers heavy machine guns. The infantry advanced in extended waves. The first took the nearer objective and dug in, and the following waves passed through them to the further objectives. Special parties mopped up the captured pillboxes so that their garrisons could not fire into the attackers’ backs, as had happened at Frezenberg in August.
Facing them were the German 50th Reserve Division, 3rd Reserve Division and 23rd Reserve Division, and behind them the counter-attack divisions: the 17th Division, 236th Division and 4th Bavarian Division, with the 234th Division in reserve. According to Bean, the 3rd Reserve Division contained a good many Poles, some of whom made no secret of their sympathy for the Allies, and some of whom actually wanted to be taken prisoner.
Course
26 September, centre: the Butte. The barrage came down at 5.50 a.m., as the plateau emerged from the darkness. The ground was dry, so the explosions threw up a wall of dust and smoke so thick that officers kept direction by compass. Bean wrote that it was the most perfect barrage that had ever led Australian infantry, and that it rolled ahead of the men “like a Gippsland bushfire”. General Hobkirk packed the twelve waves of the 14th Brigade into a strip about 55 metres deep, right up against the barrage line, so the German barrage, which came down at four o’clock, fell behind them. After about 450 metres the outline of the Butte emerged from the mist. The German machine-gunners on top fled, and the Australians stormed the mound and bombed the entrances to the dugouts on its rear slope. Inside, about 60 Germans surrendered, most of them stretcher-bearers. At 7.30 a.m. further battalions went on to the second objective, a stretch of the Flandern I line almost a kilometre long, of which only shreds of wire were left. The brigade took about 200 prisoners and 34 machine guns. Among the dead was the commander of the 53rd Battalion, Lieutenant-Colonel Croshaw.
26 September, right flank: Elliott. The hardest fighting was on the southern edge of the wood, where the Germans had regained ground the day before. Elliott’s 15th Brigade, which had spent the whole of 25 September repelling the German attack, had to attack from a line partly held by the enemy, and two of its battalions had been replaced during the night by two battalions of the 8th Brigade, which reached the starting tapes last, ten minutes before zero. The British 98th Brigade on their right had not managed to recapture the lost line during the night, so the Australian right flank advanced with its flank exposed. From the ruins of Jerk House and Cameron House German machine guns raked it from the side and from behind. Some of the battalions stopped at the first objective and bent back their flank to the south. Even before the second stage of the attack, however, Captain Neale of the 59th Battalion led his men on, across the little valley of the Polygonebeek stream, took a group of pillboxes in which the commander of the German sector was captured with about 60 men, and got almost to the second objective. Private Patrick Bugden of the 31st Battalion led attacks on pillboxes in these days and carried wounded men out from under fire. He was killed on 28 September and was posthumously awarded the Victoria Cross. The British 2nd Battalion, Royal Welch Fusiliers, sent to the exposed flank, reached Jerk House at noon, but in the afternoon, as its ammunition ran out, it fell back.
26 September, north: Zonnebeke. The 4th Australian Division crossed its sector almost unhindered, replying only to the fire of isolated pillboxes. Sergeant John Dwyer of the 4th Machine Gun Company destroyed a German post with the fire of his gun, brought back the captured gun and fought on with it, for which he received the Victoria Cross. The division’s left battalion reached the brickworks at Zonnebeke. To its left the British 3rd Division entered the village but did not take the railway station or Hill 40, and further on the 59th Division took a series of fortified farms, among them Kansas Cross and Schuler Farm. The brigade of the 58th Division on the Gravenstafel spur got stuck in the mist a few hundred metres short of its objective.
26 September, afternoon: the counter-attacks. When the mist lifted before noon, airmen of the Royal Flying Corps and observers on the Butte could see from afar the German counter-attack divisions coming down from the Broodseinde and Becelaere ridge. The 236th Division crossed the ridge at about 2.30 p.m. and at once ran into artillery fire. At 3.25 p.m. Captain Albert Jacka of the 14th Battalion fired the flares calling for a defensive barrage, and the attack collapsed. The 17th Division, advancing on Polygon Wood from the south, was massacred in Holle Bosch wood and on the Reutel hill, and the 4th Bavarian Division lost more than 1,300 men in the mud by the Paddebeek stream. According to German accounts, the counter-attack divisions needed up to two hours to cover a kilometre through the British barrages and arrived exhausted, at best at the line where the remnants of the front-line divisions were holding on. Their only success was driving back the British 3rd Division on Hill 40.
27 September – 3 October. During the night and on the morning of 27 September, on the right flank, Lieutenant-Colonel Norman Marshall’s Australians took Cameron House and the Cameron Covert copse with few losses, and in the afternoon the British of the 33rd Division joined them. With that the whole objective on this difficult sector had been taken. That day the 39th Division repulsed three German attacks on Tower Hamlets, and the 3rd Division a heavy attack near Zonnebeke. Hill 40 was left for the next attack. On the night of 27/28 September fresh British divisions began relieving those that had fought. On the morning of 30 September fresh German regiments with flamethrowers and storm troops of the Fourth Army struck the 23rd Division north of the Menin road and were repulsed. On 1 October another attack, led by a special group under General Arthur von Gabain, pushed two battalions back by about 140 metres, and in these days the Germans also took Joist Farm by Polygon Wood from the 21st Division. Further attacks were repulsed. The last German attacks, on 3 October near the Menin road, also failed.
Losses
The British official history gives 15,375 killed, wounded and missing in the seven attacking divisions. The heaviest losses were suffered by the 3rd Division (4,032), the 5th Australian Division (3,723) and the 33rd Division (2,905). Bean gives slightly higher figures for the two Australian divisions: by his count the 5th Division lost 4,014 men on 26–28 September and the 4th Division 1,717, and total Australian losses in the battle are estimated at about 5,800.
German losses are only partly known. The German official history gives about 13,500 killed, wounded and missing from 21 to 30 September, that is, including the counter-attacks after the Battle of the Menin Road. The British official historian James Edmonds added 30 per cent for lightly wounded to this figure, which is disputed. The 50th Reserve Division alone lost 1,850 men, and the 4th Bavarian Division more than 1,300 in a single counter-attack.
Significance
The battle was one of the cleanest victories of Plumer’s method. The British and Australians took almost all their set objectives, gave up not an inch of captured ground to the German counter-attacks and stood at the foot of the Broodseinde ridge. The chief of staff of the German “Wytschaete” group, Lieutenant-Colonel Albrecht von Thaer, wrote on 28 September that he was living through “truly dreadful days” and did not know what to do against limited attacks and their devastating artillery: strengthening the front line would only mean offering the British more men to kill, and holding reserves back for counter-attacks had failed. Only masses of tanks could have helped, and the Germans had none.
On 28 September Paul von Hindenburg decided to return to a more strongly held front line, and on 29 September General Erich Ludendorff conferred at Roeselare with Rupprecht and the Fourth Army command. Immediate counter-attacks during a British attack (Gegenstoß) were to give way to deliberate counter-attacks (Gegenangriff) after 24–48 hours, and the front line was to get more men and machine guns. The Fourth Army issued orders to this effect on 30 September. Ludendorff later admitted in his memoirs that finding the right solution had been “incredibly difficult”. The new tactics proved disastrous as early as 4 October: at Broodseinde the British attack struck the thickened front lines and German divisions preparing to counter-attack, which suffered heavy losses.
For the Australians Polygon Wood was one of the most successful battles of the war, though bought at a high price. For the 5th Division, which had bled itself white at Fromelles in July 1916, it was the first great victory. Elliott, to whom Bean largely credits saving the attack on the threatened right flank, himself regarded the counter-attack at Villers-Bretonneux in April 1918 as the most important fight of his life, but his subordinates pointed to Polygon Wood. On top of the Butte today stands the memorial of the 5th Australian Division, and the ruins of three German pillboxes survive in the wood. Nearby lie the Polygon Wood and Buttes New British Cemetery war cemeteries, the latter with a memorial to New Zealand soldiers missing with no known grave. The battle was recorded by Australian war photographers, among them Frank Hurley.
Spotted a mistake?Report an error