1917: Flanders
Battle of Broodseinde
- Dates:
- 4 October 1917
- Front:
- Western Front
- Location:
- The Broodseinde ridge on the eastern edge of the Gheluvelt plateau (Geluveld), from the Ypres–Menin road through Zonnebeke and the Gravenstafel spur to Poelcappelle (Poelkapelle), West Flanders (Belgium)On the battle map →
- Sides:
- United Kingdom, Australia and New ZealandDouglas Haig, Herbert Plumer, Hubert Gough, William Birdwood, Alexander GodleyGerman EmpireRupprecht, Crown Prince of Bavaria, Friedrich Sixt von Armin
- Result:
- British victory. Australians, New Zealanders and British took the Broodseinde ridge and the Gravenstafel spur, broke two German divisions and took nearly 5,000 prisoners.
- Author:
- Łukasz Skowroń
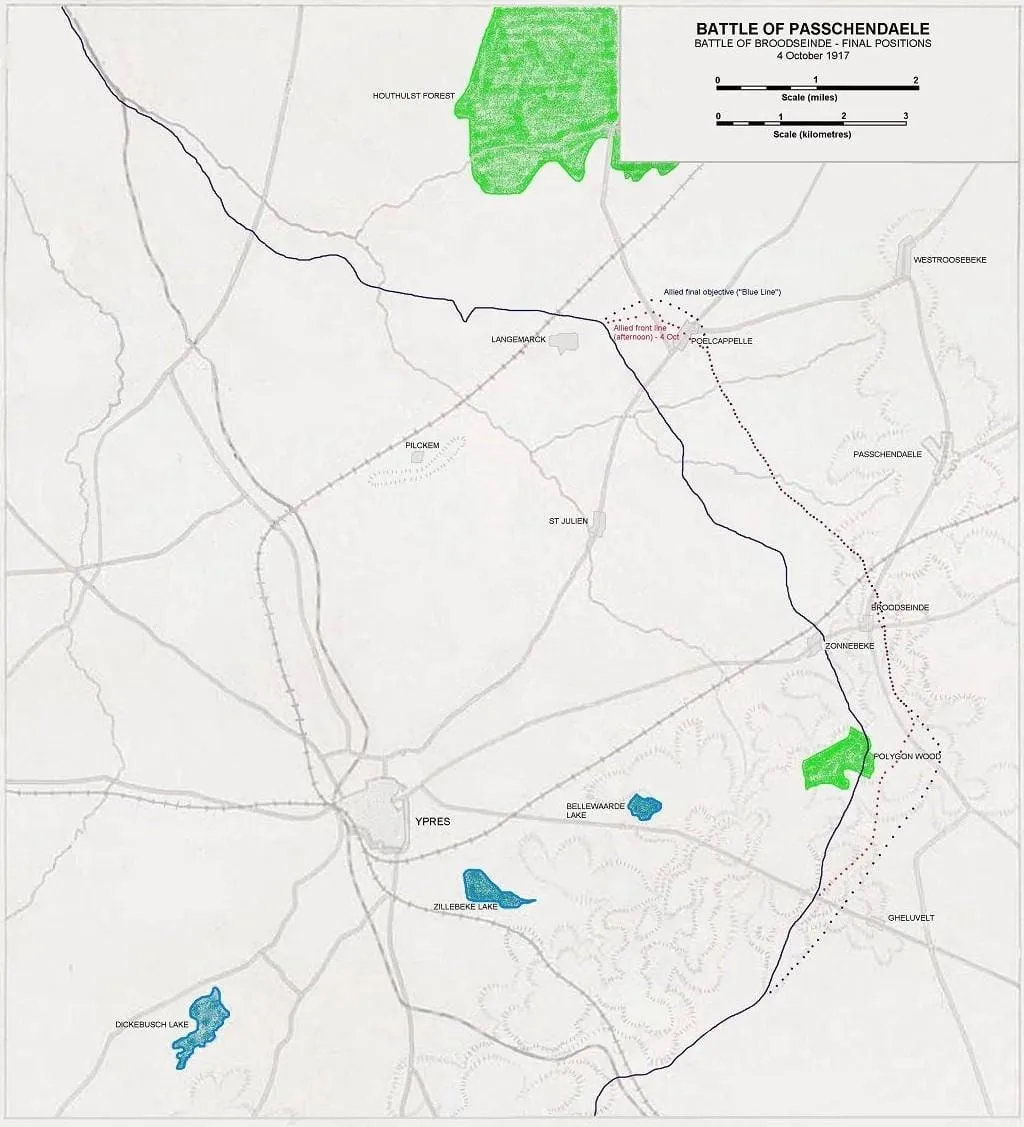
The Battle of Broodseinde was the third and most important of General Herbert Plumer’s September–October “bites” in the Third Battle of Ypres. At 6 a.m. on 4 October 1917 twelve British divisions of the Second Army and the Fifth Army went forward on a front of about 13 kilometres, from the Ypres–Menin road to the Staden railway. The main blow was struck by the two Anzac corps, which for the first time in the war fought side by side with four divisions: three Australian and the New Zealand Division. Their objective was the Broodseinde ridge, since 1915 the mainstay of the German defence east of Ypres. By chance the Germans had prepared an attack of their own for the same dawn, and the advancing Australians collided with them in no man’s land. Before nine o’clock the whole ridge was in Anzac hands, and the German counter-attacks broke down under artillery fire. The German official history called the day “the black day of 4 October”. That same day, however, the rains returned, and in the following weeks they dashed the hopes the victory had raised.
Name and dates
Broodseinde is a hamlet at the crossroads of the roads from Zonnebeke to Moorslede and from Beselare to Passchendaele, on the ridge that curves round east of Ypres. In the autumn of 1914 it was held by the British, and in May 1915, during the Second Battle of Ypres, they withdrew from it to shorten the front. From then on the Germans had a view of the whole Ypres salient from there, laid out like a map.
The British Battles Nomenclature Committee classed the attack of 4 October 1917 as the fifth of the eight battles of Ypres in 1917 and named it after the hamlet. The committee limited it to a single day. The next attack, on 9 October, it counted as a separate battle. The Germans treated it as one of the phases of the Battle of Flanders (Flandernschlacht).
Background
After the battles of the Menin Road on 20 September and of Polygon Wood on 26 September the British held most of the Gheluvelt plateau (Geluveld). From the start of the Second Army’s offensive Plumer and his chief of staff, General Charles Harington, had considered that the third step, onto the Broodseinde ridge, would be the most important. The commander of I Anzac Corps, General William Birdwood, feared that his divisions, as on the Somme, would be exhausted after the first attack, so General Alexander Godley’s II Anzac Corps was warned that it might have to take over their task. The 1st and 2nd Australian Divisions, however, came out of the battle of 20 September so little weakened that it was decided to use them for the attack on the ridge as well. II Anzac Corps took over the sector north of them, and its task was to capture the junction of the ridge with the Gravenstafel spur.
The date, originally 6 October, was brought forward by two days because autumn was approaching, and for the first time the Second Army staff had to hurry because of the weather. Field Marshal Douglas Haig was increasingly convinced that the German army was wavering. On 28 September he told the army commanders that after the capture of Broodseinde the time would come for deeper attacks with cavalry and tanks, and although Plumer and General Hubert Gough thought this premature, on 2 October he approved plans for exploiting success. He also decided to continue the offensive at Ypres for as long as the weather allowed and to bring further divisions to Flanders, including the Canadian Corps.
The Germans, shaken by the defeats of 20 and 26 September, had meanwhile changed their tactics. On 29 September General Erich Ludendorff conferred at Roeselare with the command of the army group of Crown Prince Rupprecht of Bavaria and of General Friedrich Sixt von Armin’s Fourth Army. It was decided that the front line would receive more men and machine guns in order to break the British attack at the very outset, and that the regiments of the counter-attack divisions (Eingreifdivisionen) would stand close behind the front-line divisions. In practice this meant packing a large mass of infantry onto the forward slope and the ridge, within range of the British artillery. The counter-attacks of 30 September and 1 October near Polygon Wood ended in bloody failures.
Plan and forces
Plumer repeated the method of 20 and 26 September. The attack was to proceed in two stages: first to the “red line”, 100–200 metres short of the crest of the ridge, and after a pause of about an hour over the crest to the “blue line”, 200–400 metres beyond it. The Australian divisions were to advance from about 1.1 to 1.9 kilometres on a front roughly a kilometre wide, and the New Zealanders about 900 metres on a front twice as wide. There was no proper artillery preparation apart from counter-battery fire and the shelling of strongpoints: from 27 September, and from 1 October twice a day, the artillery fired practice barrages, and the real bombardment was to fall only at zero hour. According to the Australian official historian Charles Bean, on the two Anzac corps’ front, about 4.5 kilometres wide, there were in theory nearly a thousand guns, although some of them were out of action and the artillery of I Anzac Corps was weaker than on 26 September.
From the south the attackers were: the 37th Division of IX Corps beyond Tower Hamlets; X Corps with the 5th Division in the valley of the Reutelbeek stream and the 21st and 7th Divisions on the eastern tip of the plateau at Reutel and In de Ster; in the centre Birdwood’s I Anzac Corps with the 1st and 2nd Australian Divisions; and north of the Ypres–Roeselare railway Godley’s II Anzac Corps with General John Monash’s 3rd Australian Division and General Andrew Russell’s New Zealand Division. The left wing was formed by Gough’s Fifth Army: XVIII Corps with the 48th and 11th Divisions near Poelcappelle (PL) and XIV Corps with the 4th and 29th Divisions.
Opposite them stood the German 19th Reserve Division on the southern edge of the plateau, the 4th Guard Division at Zonnebeke and Broodseinde, the 20th Division facing II Anzac Corps and further divisions towards Poelcappelle, and behind them the counter-attack divisions, including the 45th Reserve Division and the 4th Bavarian Division. The 4th Guard Division concluded that without retaking the Tokio spur in front of Zonnebeke it could not hold the ridge, and prepared Operation “Höhensturm” (Storm of the Heights): the 212th Reserve Regiment of the 45th Reserve Division, reinforced with storm troops and trench mortars, was to pass through the Guards’ lines and recapture the spur from Zonnebeke to the edge of Polygon Wood. The attack was planned for dawn on 3 October and, after the failure of 1 October, postponed to 4 October. The Germans knew that the British were preparing a blow, and from 1 October they alerted the counter-attack divisions every night. During the night of 3–4 October the commanders hesitated over whether to call off their own attack, but in the end decided to go ahead, warning the artillery that it might have to switch to defence at any moment.
Course of the battle
The night and the German bombardment. After dark on 3 October the Anzac battalions moved up to the jumping-off tapes. Around midnight it began to rain, the ground became slippery, and crossing the marshy valley of the Zonnebeke stream cost the 3rd Australian Division much effort. Almost all the battalions were packed close to the front line so as to get out from under the German barrage quickly after zero hour. At about 5.20 a.m. yellow flares rose over the Broodseinde ridge, and a few minutes later a German bombardment came down. It was the preparatory fire for “Höhensturm”, but the Australians thought their attack had been discovered. Shells and mortar bombs fell above all on the 1st and 2nd Australian Divisions lying in the shell holes. According to Bean, about one-seventh of the attacking troops of I Anzac Corps were killed or wounded even before zero hour. Barrage fire could not be called down, because in the last ten minutes before the attack the artillery did not answer signals.
6 a.m.: the collision. At six o’clock the British bombardment came down, and the German fire stopped as if cut off with a knife. The Australians advanced behind the wall of fire and after a few dozen metres saw in front of them a second line of skirmishers rising from the shell holes. These were men of the 212th Reserve Regiment, ready to attack, some with bayonets fixed. The Australians opened fire on the move, the first German wave fell, and the rest fled, often straight into the British barrage. According to Haig, the British attack forestalled the German one by about ten minutes. Beyond no man’s land the pillboxes and shell holes were defended by the Guards, who on many sectors fought more fiercely than on 20 September. The 2nd Australian Division passed on both sides of the Zonnebeke lake and cleared the ruins of the village, and the New Zealanders, after about 200 metres, came upon the remnants of German units shattered by the barrage and scattered them with the bayonet.
The red line. Between 6.45 and 7.20 a.m. the Anzac divisions reached the first objective. The pause short of the crest proved the most difficult moment of the day. Machine guns and field guns firing over open sights opened up from the ridge, and by the Beselare–Passchendaele road, in a large crater left by an old explosion, the battalion headquarters of the 5th Foot Guard Regiment and the 212th Reserve Regiment held out. Victorians of the 2nd Brigade of the 1st Division took the crater after a twenty-minute fight with grenades and rifle grenades, and men of the 7th and 8th Battalions, led by Captain Traill, captured a few hundred metres further on a battery of field guns and the underground dugout of an artillery headquarters. In the north the 3rd Australian Division was rounding up prisoners in the dugouts along the railway embankment in numbers that Australian units had not yet seen in this war.
The crest and the blue line. At 8.10 a.m. the second stage began. The 1st and 2nd Australian Divisions crossed the crest almost unopposed, and for the first time since May 1915 British soldiers saw the green Keiberg ridge, the church tower of Beselare and the undamaged plain of Flanders. The divisions dug in on the slope beyond the ridge. On the right wing the 7th Division took the In de Ster spur and from its slope enfiladed every German unit that tried to attack the 1st Australian Division. Only at the Broodseinde crossroads did the 7th Australian Brigade stop in the face of fire from the Daisy Wood copse and dig in in an old British trench of 1914–1915, in which the soldiers dug up the uniforms of long-dead British soldiers. The heaviest fighting fell to the 3rd Australian Division, whose 40th Battalion from Tasmania had to take pillbox after pillbox in the Flandern I line on the Gravenstafel spur. Sergeant Lewis McGee of that battalion and Lance Corporal Walter Peeler of the 3rd Pioneer Battalion were awarded the Victoria Cross for that day. By 9.12 a.m. the 3rd Division’s entire objective had been taken. The New Zealand Division occupied the Gravenstafel spur with the Abraham Heights rise, Berlin Wood and Kronprinz Farm, taking 1,159 prisoners from four divisions.
The flanks. In the south X Corps took most of its objectives, though not all. The 21st Division, helped by tanks, crossed the marsh along the Polygonebeek stream and occupied Reutel. In X Corps’ sector Captain Clement Robertson, who had led his section’s tanks on foot under fire across the sodden ground, was killed after reaching the objective and became the first soldier of the Tank Corps to be awarded the Victoria Cross, posthumously. The 5th Division took Polderhoek Château, but towards evening, after several further counter-attacks, the Germans recaptured the château and the eastern part of Reutel. In the north the 48th Division crossed the valley of the Stroombeek stream, though it stopped a few hundred metres short of its final objectives, and the 11th Division, helped by tanks, took the western part of Poelcappelle with the church. The 4th and 29th Divisions fought for 19 Metre Hill, from which a German counter-attack in the afternoon drove the British for a time.
The counter-attacks. The German reserves went forward in a hopeless position. The reserves of the 4th Guard Division, brought up from the artillery protection line, failed to break through the fire from In de Ster, and rumours spread through German headquarters of a breakthrough towards the Keiberg. The regiments of the 4th Bavarian Division, sent from the south towards the Broodseinde crossroads, ran one after another into the British barrage and machine-gun fire from the crest, and their remnants huddled in the Daisy Wood copse, which was shelled by Australian and British artillery. A battalion of the 45th Reserve Division, exhausted after 1 October, was turned back as unfit to attack. No counter-attack regained a scrap of ground on the Anzac front.
The afternoon. At about 11 a.m. airmen’s reports confirmed that the objectives had been taken almost everywhere. Haig’s chief of intelligence, General John Charteris, drove to Second Army headquarters to discuss exploiting the success. At about 12.30 p.m. it began to rain. Godley wanted to strike along the ridge towards Passchendaele, and Plumer considered an attack by I Anzac Corps on the Keiberg, but Birdwood preferred to wait until the artillery, already firing at the limit of its range, had been brought forward, and the commander of the 7th Division was unsure of the situation on his right flank. At 2 p.m. Plumer gave up. An attack by the right wing of the Fifth Army planned for the late afternoon brought no result in the rain and gathering darkness. In the 3rd Australian Division, where the stretcher-bearers’ route was longest, the evacuation of the wounded broke down, and the badly wounded lay all night in the mud between the pillboxes.
Casualties
According to Bean, the Australians lost about 6,400 killed, wounded and missing: the 1st Division 2,448, the 2nd Division 2,174 and the 3rd Division 1,810 men. Many of the dead of the 1st and 2nd Divisions were killed before zero hour, and some were never found. The New Zealand Division’s losses are given as about 1,700–1,900. Of the British divisions, the 21st Division lost the most, over 2,600 men. Total British and Dominion losses in the battle are estimated in some works at about 20,000.
German losses were very heavy. The 45th Reserve Division lost 2,883 men and the 4th Guard Division 2,786. In the 212th Reserve Regiment alone the regimental commander, Lieutenant-Colonel Rave, 13 officers and 328 men were killed, and over a thousand were wounded, missing or sick. The German official history gives 35,000 casualties for the period 1–10 October. The British counted 4,759 prisoners, and Haig in his dispatch gave over 5,000, including 138 officers.
Significance
The British and their Dominion allies had taken the most important objective of the offensive so far and carried out the plan almost exactly. The German decision to thicken the front line ended, as Bean wrote, only in the destruction of the troops packed into it. Ludendorff admitted that the battle had been “extraordinarily severe” and that the Germans had again come out of it with “enormous losses”, and the history of the 5th Foot Guard Regiment called it the regiment’s worst day of the whole war. Plumer reportedly called the victory “the greatest since the Battle of the Marne”, and British war correspondents, wary of earlier boasts, judged it the most complete success of the British army in France and Belgium. In London it was received more coolly. General Henry Wilson noted on 5 October that David Lloyd George “has no illusions about Haig’s ‘victory’”.
The Germans had to change their tactics once again. On 7 October the Fourth Army returned to defence in depth: the first zone was to be held only by outposts, which would fall back under attack onto the main line of resistance, covered by an artillery barrage. Ludendorff demanded that Rupprecht not allow his troops to be shattered by enemy fire and give way before it. The chief of staff of Group “Wytschaete”, Lieutenant-Colonel Albrecht von Thaer, quarrelled with the Fourth Army’s chief of staff, General Fritz von Loßberg, who ordered the exhausted divisions to counter-attack. Rupprecht, who lacked the strength for a counter-offensive, began to consider a series of voluntary withdrawals, even at the cost of uncovering the Belgian coast.
Bean believed that at noon on 4 October the British forces on the Western Front stood for the first time in years before the possibility of a decisive victory. Haig, persuaded by Charteris’s evening report that the Germans did not have a single fresh division nearby, ordered the advance to continue without delay and set the next attack for 9 October. The weather, however, broke. The rain that began at noon on 4 October turned the battlefield into a swamp through which the artillery could not pass, and at Poelcappelle and in the First Battle of Passchendaele Plumer’s method ceased to work. Broodseinde remained the most successful attack of the whole Third Battle of Ypres and one of the points of contention in judging Haig: some historians believe that the offensive should have been stopped right after this victory.
Spotted a mistake?Report an error